Tag Archives: vintage inspired

(More) Quarantine Art
Since about mid-November, my state when through a second, more mild, quarantine which put classes and activities in my Artshop program temporarily on hold and sent me back to working from home again. I will be plunging back into things as they reopen TOMORROW, so today I’d like to share some of the work I finished over the last couple months.
This first piece was a very fun commission where I was asked to do a surreal portrait in my signature mixed media, vintage inspired style but based on the song “Little Wing” by Jimi Hendrix. I was given some guidelines as to the type of figure portrayed and color scheme, but otherwise the project was completely open ended. And so, this piece was born, communicating a sense of love and positivity, openness, kindness and warmth, and creative spirit.

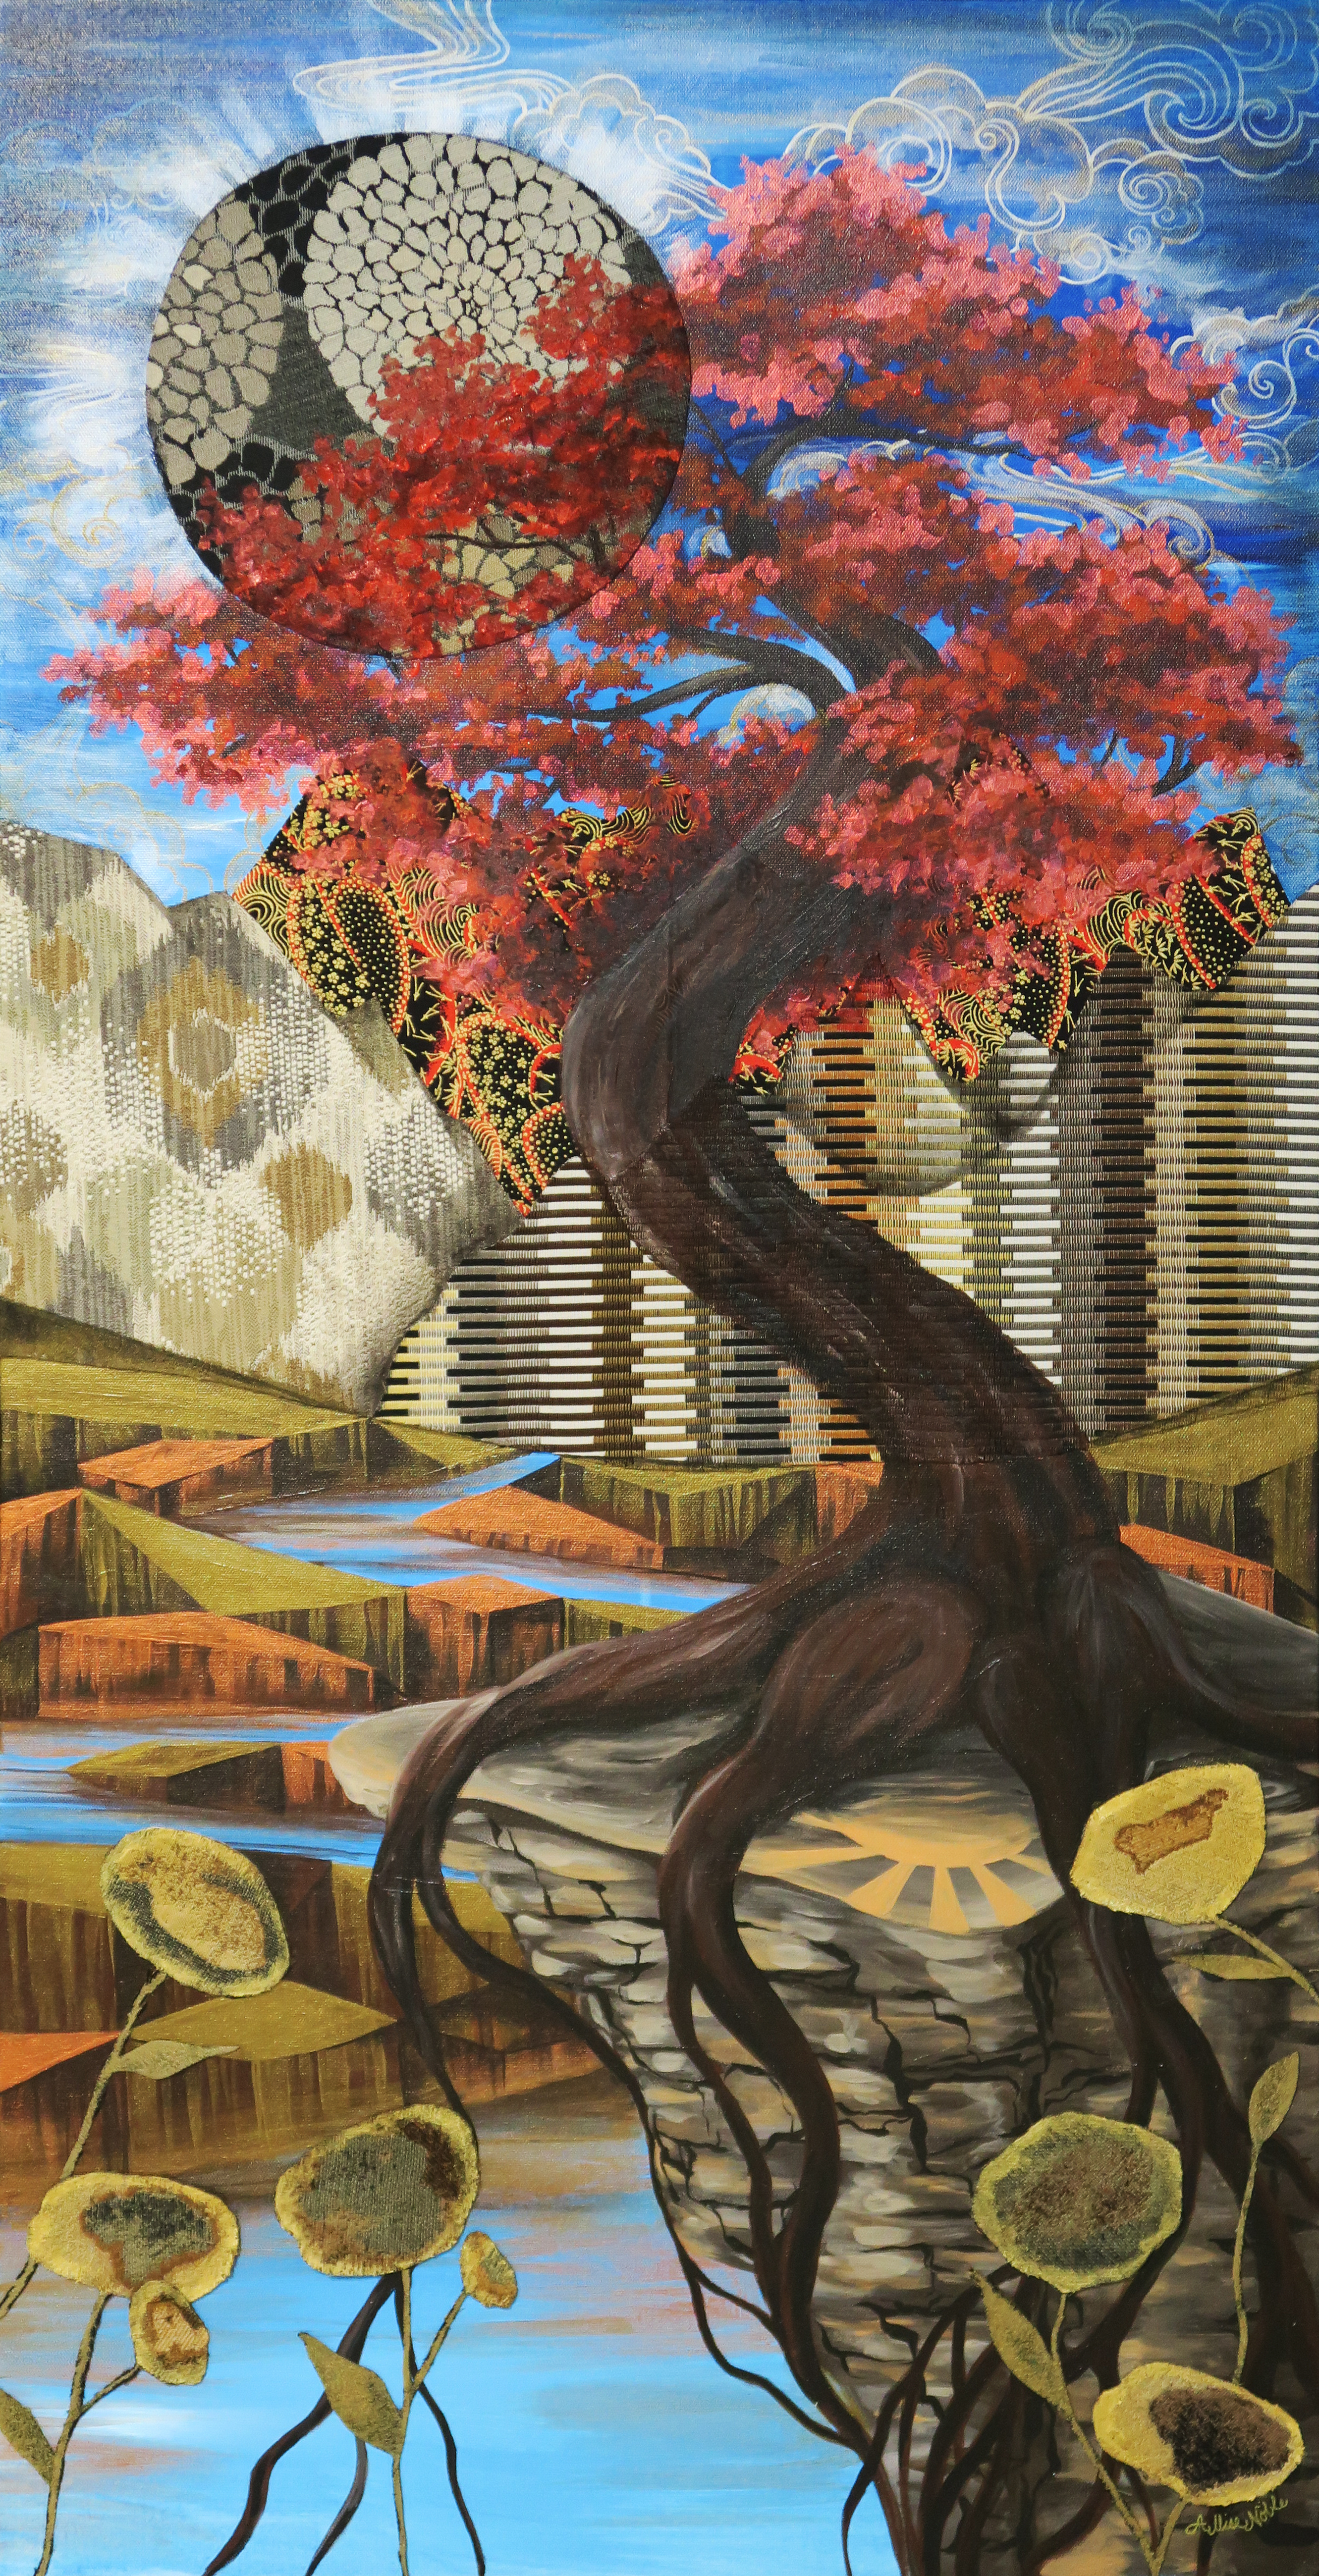
It felt really good during this time, which to be honest though less restrictive seemed to be a hell of a lot more frustrating than the first full quarantine, to continue the trend of just working on creating some beautiful, uplifting imagery. The piece below is my largest to date at 4 entire feet high! That may not seem like a big deal to some, but everyone who knows my work knows I work small, “big” for me usually being 18×24″. Also note, no people or animals in this piece! I have another large canvas still untouched, and to really step out of my box I think I should do something architectural next.
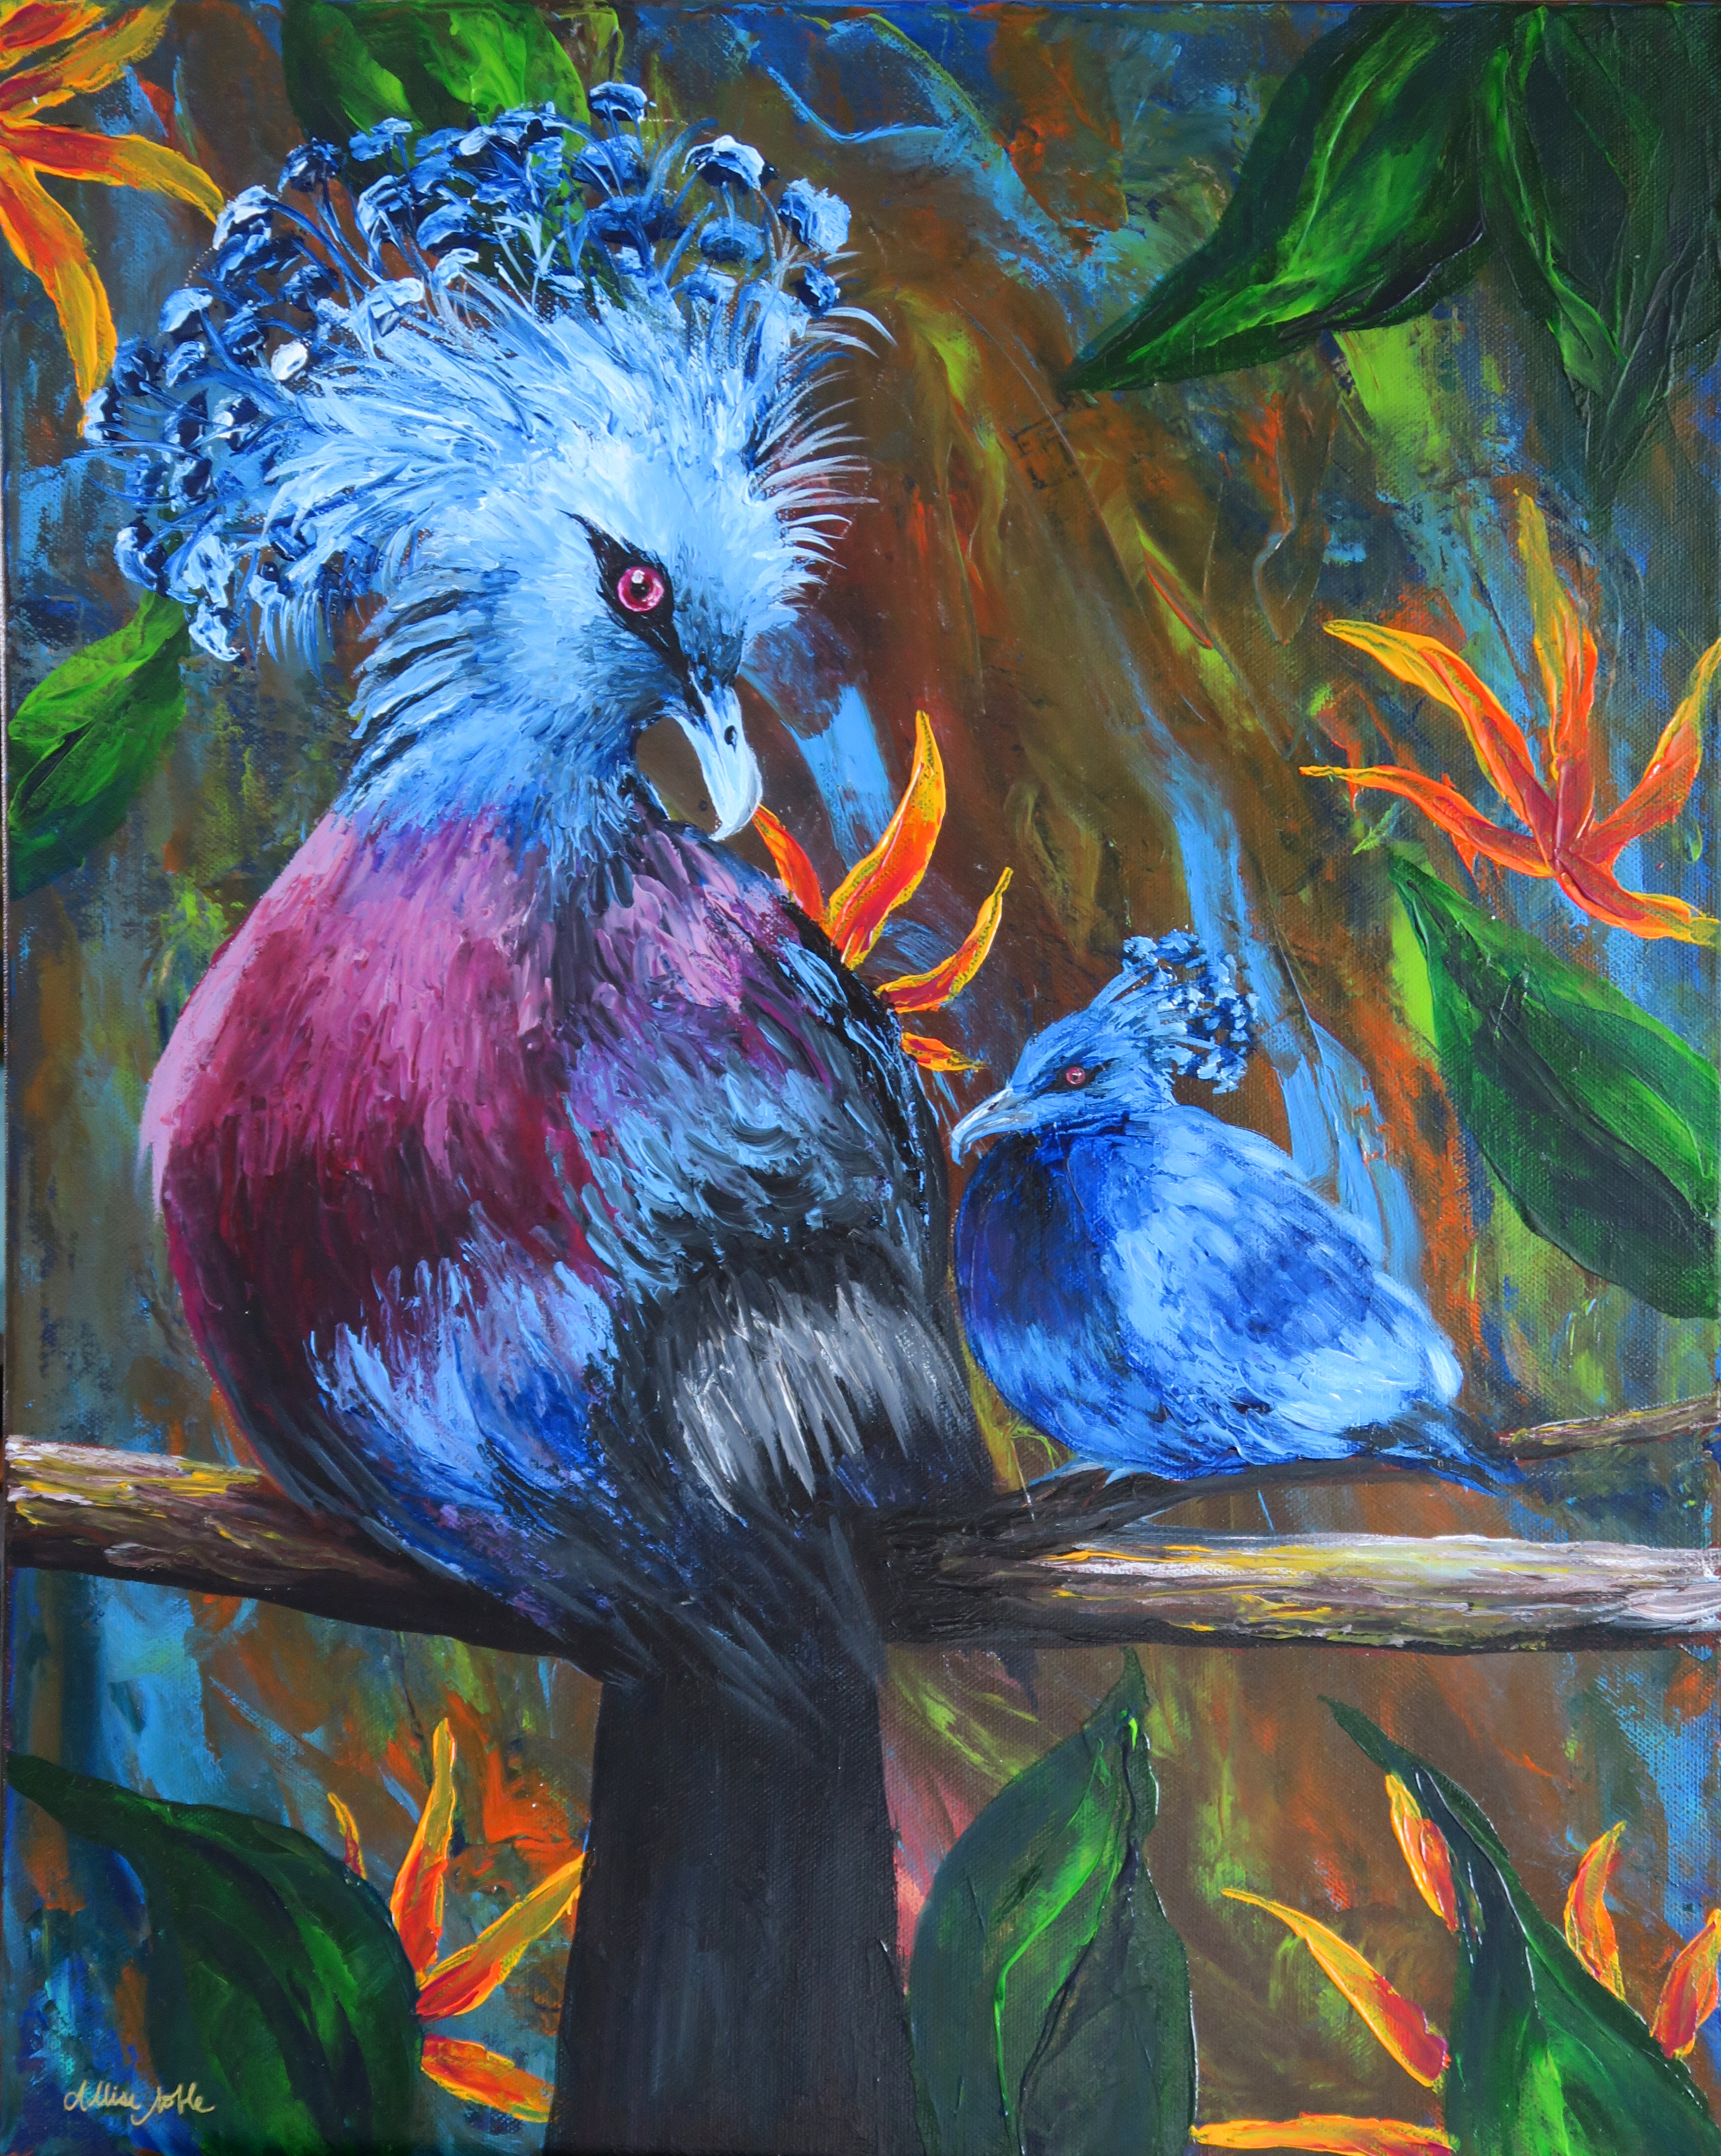
I also finished a full size bird palette knife painting, the rest of what I’d completed being minis. Yes, these are real birds! I’m always saving photos of exotic and interesting birds on Pinterest, and the colors and adorable yet zany plumage coming out of the top of these guys’ heads was irresistible. I found a couple of reference images, and decided I had to throw a baby in there too.
I don’t know about the rest of you, but my new year starts tomorrow. Wish me luck!
Happy 2021! Pantone COTY Inspo
Finding out Pantone’s Color Of The Year is always one of my favorite things about New Year’s Day (dork, I know). This year is a combination of 2 colors … Ultimate Gray and Illuminating. I’m not a big yellow person on its own, but love it paired with gray or black so I’m digging this theme (See my bathroom). To celebrate, I created a fun 9×12″ mixed media artwork using ink and water on watercolor paper, and some fabric scraps and old book pages for the background.
What’s interesting is I also started a new project late this year in collaboration with a supporter of the inclusive arts program I run, Express Yourself Artshop that ended up in this same color scheme. The project celebrates the independence and unique homes and lifestyles of adults with disabilities. My friend Ric LOVES yellow. More on this to come at a later date!

What do you think of this year’s colors? What kinds of videos would you like to see me share in 2021?
Make A DIY Bib Necklace
I’ve shared my fun mixed media necklaces I’ve been creating in the past, inspired by a class project the week my Creative Minds students learned about artist Sonia Dealunay. Today I wanted to show you the creative process firsthand!
I use a lot of castoffs and odds and ends like scraps of jewelry chain and fabric, discontinued upholstery samples, and pieces from broken jewelry. Antique stores, thrift shops, garage sales, and ebay are all great resources!
I love how fun and unique you can make these necklaces, collaging in any shape you want though I’ve stuck with the classic bib collar design for now. Most of mine are very nature inspired but again, you could take something like this in a whole different direction. The possibilities are endless! I hope some of you are inspired to play around, but for those who’d rather just buy one I do sell the necklaces I make in my ebay shop.
As always, if you have any questions shoot them my way. Happy creating!
Mid-Century Modern Tea Party – Butterflies
I’m back with another mid-century modern spring illustrations tutorial! Moving on to my next teacup, today I’m doing butterflies. Similar to my last tutorial, you can create any of these designs the same way on paper with any drawing or painting materials you may have on hand. If painting on glass, keep in mind you will need multiple coats if you want solid coverage, but you may also like the transparency – it’s up to you. To keep your designs permanent, they need to be heated in a conventional oven. Put glass pieces in a cold oven, then set to 350 degrees for 30 minutes. Turn off the heat and LEAVE the glass in the oven until completely cooled down.


For this design, you are going to start with 4 teardrop shapes for your butterfly wings. The top 2 should be tilted at a downward diagonal, and the bottom 2 at an upward diagonal. Try to smooth out your paint as flat and even as possible, spreading out any “globs”. I used a flat brush rather than a round, pointed brush to achieve more even coverage. For the flowers, add some upward facing bell or “cup” shapes at different heights. Once the orange dried on my butterfly wings, I chose to streak some yellow over as well with a smaller round brush.


Next, I added some accents over my solid shapes in white. I painted a smaller identical teardrop shape inside each of my wings. I also added an elongated almond shape to the top of each of my bells which will be the opening of each flower.
I also added the leaves by painting green teardrop shapes tilting diagonally upward centered under each of my flower heads. I dipped the opposite end of my paintbrush in paint and stamped dots down the center of each leaf as an added decoration.
The last addition after the leaves was a small orange diamond in between the bottom butterfly wings. This will start the body. The rest of the body will be added with line work.


Next, I added one more set of teardrop shapes inside the white on the wings in yellow. I also used a fine detail brush to add yellow stripes across the small diamond shape in between my wings.
Last is the line work that brings everything together and makes it pop. For this part, you can either use a black paint marker or a small detail brush with a pointed tip. Outline Your outer bell shape, white flower opening, and leaves. Add a line connecting the flower head to the leaves. To finish the flower, I then used the tip of my brush and a light touch, hardly pressing on the surface, to add 4 streaks radiating up from the base of the flower head. I also added 5-6 short lines inside each flower opening, and then used the opposite end of my brush to stamp tiny dots on the end of each of these lines on the inside of the flower. For the butterfly, I outlined each teardrop shape that make up the wings, as well as the small diamond shape.


The last detail was adding a line down the center of the wings, with two curved antennae branching off at the top.
It’s amazing what you can do with simple shapes! I will be doing 4 designs in all with different flowers and insects, check back for more! The final set will be available for sale in Express Yourself Artshop’s Virtual Gallery, an ongoing fundraiser for the arts and wellness program I direct.
New Work: Space Is A Lonely Place To Be
Like many, my life has been affected by COVID-19 this month (though not as drastically as it could be, thank goodness). Here in Michigan, everything is closed but grocery stores and hospitals, and we have been urged to keep to our household until the spread slows down. I met this unexpected turn of events with a lot of anger, disappointment, and frustration at first. I had a lot of things scheduled professionally all beginning in guess when? March and April, that are now postponed until some mysterious pending date. My spring and summer last year weren’t so hot as I was dealing with a variety of personal issues, many which were out of my control. I was really planning to harness this year to its full potential to make up for what I saw in my mind as a lot of lost time in 2019.
These feelings right now are universal; we are all dealing with processing this in some form or another. One thing I came to realize though is being frustrated or feeling angry or cheated by the universe doesn’t change anything about the current situation. We all have this forced downtime right now, and we can either waste it or use it to our advantage to learn a new skill or otherwise work on personal development, relax if we’ve been overworked, and try to fill our days with simple things we enjoy.
I work primarily in drawing mediums and watercolor. I have always struggled to work with acrylic paint, especially when it comes to realism or painting portraits and figures. I decided to take this time to practice a medium I struggle in, starting with a self portrait.

There were a lot of late nights involved with this piece, and some amount of cursing. I would show you what my acrylic attempts looked like just a month ago if I still had them, but I ended up re-using the canvases for other projects. Just believe me when I say, the difference is night and day. When we take the time to practice something new and fully devote ourselves to studying a skill, magic happens!
 This brings me to my second acrylic piece, “Space Is A Lonely Place To Be”. For this piece I was very inspired by silent film fantasy/outer space imagery and costumes, with a touch of art nouveau. I am certain a lot of this came out of feeling a bit isolated and as if I am floating outside of time … It’s strange out there right now.
It’s looking like things may stay strange for a couple more weeks, but in light of using this experience to a positive advantage, here’s what I’ve learned so far …
- I need to be mindful of building margin into my life when at all possible. I feel so much more healthy physically and mentally right now than I did when everything was normal, despite the current uncertainty in basically all areas of life and threat of danger. This is absolutely mind boggling and should not be.
- I need to learn to say no. This kind of goes with the previous statement too, as not being able to say no is how I end up with zero time to breathe. I miss my friends and students, but I did notice myself in this time of social distancing feeling a tad bit of relief that I was free from a barrage of social obligations I didn’t feel like attending because, well, all social obligations are pretty much banned right now. Life is too short to fill all your time with things you don’t want to do. Yes, as a good friend and family member there are times you need to show up for people when you don’t necessarily feel like it, but there is a balance to this, and they need to be willing to do the same for you.
- Wasting time is ok. I don’t have to have something to show for every moment I’m alive, sometimes just existing is ok! It’s ok to just sit down and read a book, or lay in bed thinking, or watch a movie in the middle of the day sometimes. It’s ok to spend time playing with a new project or idea and have it not end up turning into anything. Had I not been willing to experiment or practice with the risk of ending up with nothing at the end, I never would have learned how to acrylic paint!
What have you all been up to in your downtime? What have you learned about yourself?
Mid-Century Modern Tea Party – Ladybug
The Mid-Century modern design style has been having a moment for awhile now, and while I’m not usually one to latch onto trends I have always liked the geometric, retro aesthetic of this period.
Illustrations from this period are colorful and based on combinations of simple shapes and lines, which make them accessible to even those who don’t consider themselves “artists”. In this series, I am going to show you how to create some cute mid-century modern inspired bugs and flowers in honor of Spring. I will be painting on glassware (I’ve been dying to do something with these clear tea mugs!), but you can create any of these designs the same way on paper with any drawing or painting materials you may have on hand.


Start with a red vertical oval for your ladybug, and scatter some different large polka dots around it for our flower heads. Paint goes onto glass differently than on paper because it can’t absorb into the surface, so you will need to let your shapes dry and add another coat or two for solid coverage. Try to smooth out your paint as flat and even as possible, spreading out any “globs”.


Once we have our red oval, we are done with our ladybug for awhile. Focusing on the flowers, I added two sets of concentric circles to the bottom of my large dots in different colors, letting the paint dry in between each addition.


After that, it’s time for the leaves! Our leaves will just be simple teardrop shapes, placed next to each other at an angle centered underneath our flower heads. Once the green was dry, I added some white dots down the center of my leaves for some extra decoration. You can add a dotted pattern by dipping the end of your paint brush in paint, and touching it to your glass (or paper) using the paint brush end like a stamp.


Last is the line work that brings everything together and makes it pop. For this part, you can either use a black paint marker or a small detail brush with a pointed tip. Outline all of the shapes that make up your flower in black. I added a teardrop shape to the very center of my flower, but you can also just outline the concentric circles and leave the center alone. I added a line connecting the head to the leaves to finish our flowers. For the ladybug, I put a line down the center of my oval and outlined around the entire shape. I then added a half circle in black sticking up from the top, with two short lines for antennae. I used the end of my paintbrush to add a dot to the end of each antennae. If you have some larger paintbrushes, you can also use the end to stamp the larger dots on the ladybug’s body. Otherwise, just use a round brush with a pointed tip to outline a circle shape in the size you want and then fill it in.
Voila! See, that wasn’t so hard :). You can make some beautiful Spring designs to cover anything your heart desires once you learn the basics of how to build forms with simple shapes. I will be doing 4 designs in all with different flowers and insects, check back for more!
New Art + Forced Inspiration
So, awhile back I did a post on artist block, something I had been lucky to never really experience too much until very recently. It’s not that I didn’t have a ton of ideas, I quite simply wasn’t enthused about any of them for whatever reason and the execution just wasn’t flowing. I’m sure this had a lot to do with the crazy amount of stress I’ve been under this year for various reasons, but nevertheless I really desperately wanted to make some art I was actually excited about. I remembered how when I used to write poems and short stories back in college to unwind, if I felt the urge to write but had no clue what to write about I would put my iPod (HA, who has those anymore?) on shuffle and use the first song title that came up as inspiration for my short story, or else I’d use a random word generator and the word that came up had to be the title.
I decided to revisit this old, rather silly process of chance to see if it would jumpstart my creative but very stressed and exhausted brain. I did 4 trios of word generations, wrote them down in my sketchbook, and started drawing. It worked! I instantly came up with 4 ideas that I could easily relate to thoughts that had been jumbling around in my brain anyway, but that I just didn’t know how to access and release.
For this first one, inspiration was to be drawn from the words lung, tie, and morning.
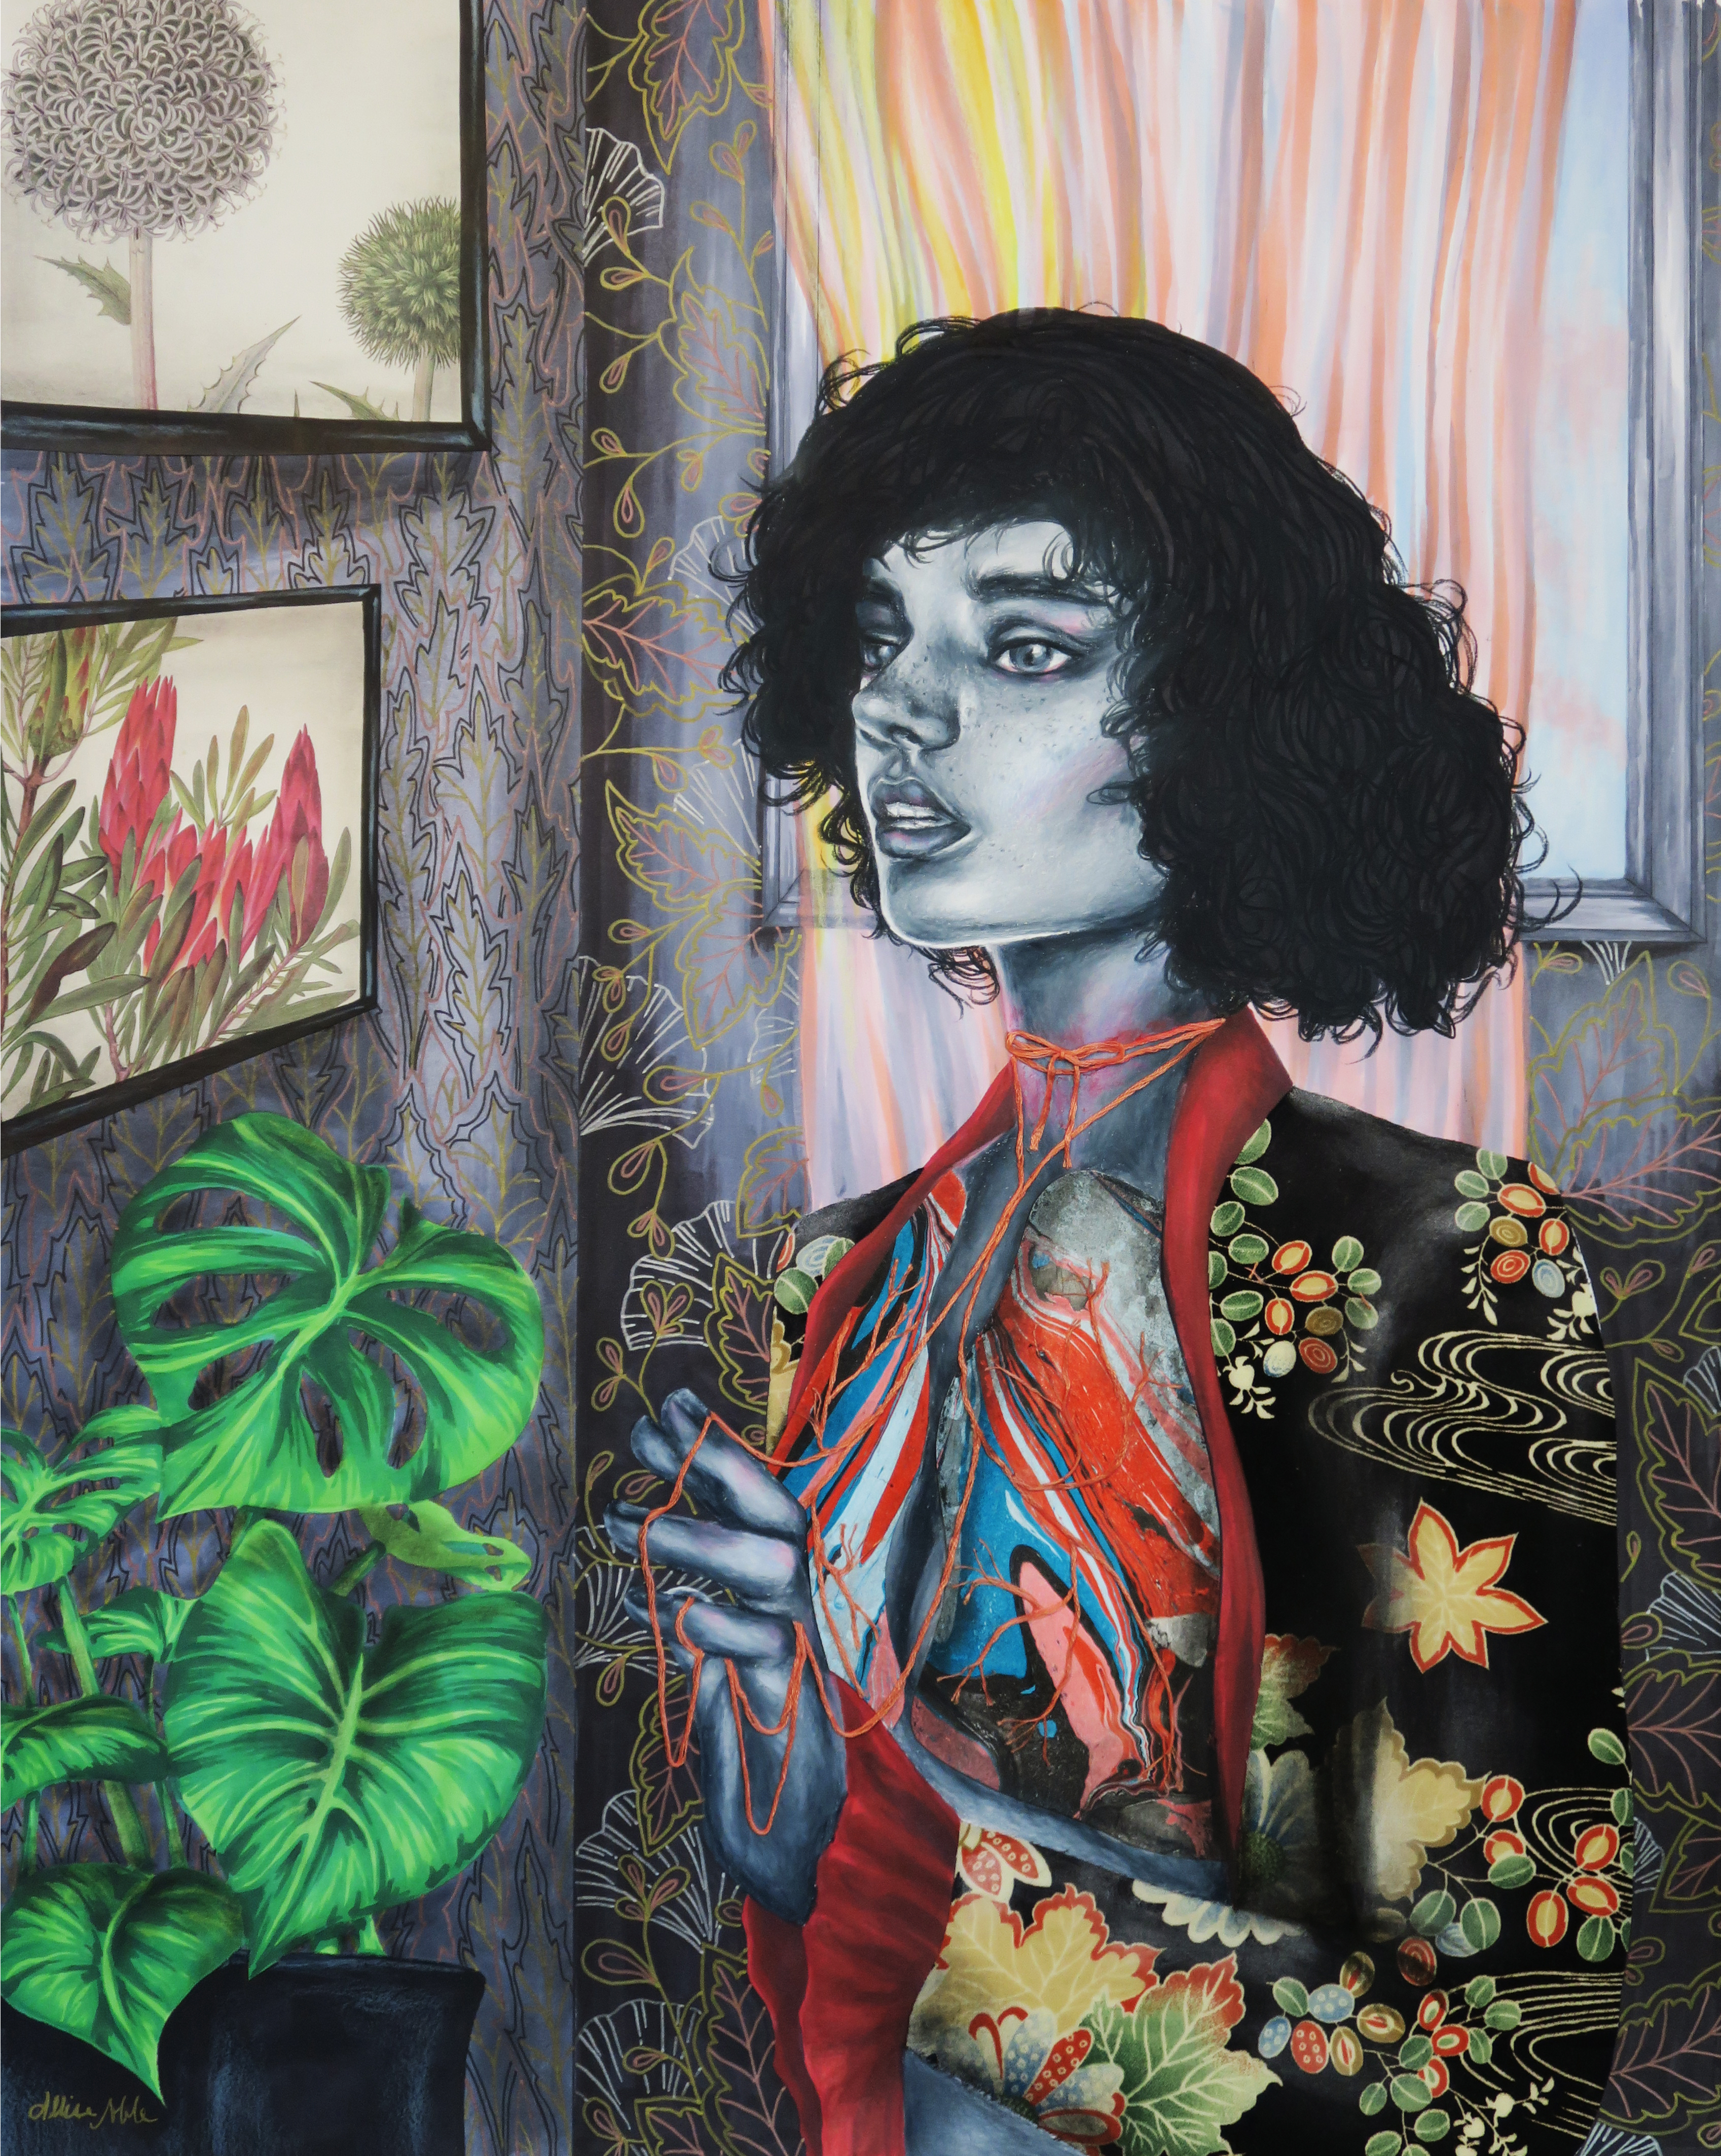
I ended up being so happy with how it turned out that I’m keeping it! I have the perfect spot in my living room, and actually only realized after I’d hung it up that the fabric I collaged for her jacket matches a swatch on my fabric scrap pillow I made about a decade ago that is now sitting on my accent chair ^_^.
“Breathe” was drawn using prismacolor pencil for the figure, and ink for the background. I used fabric for the jacket, old book pages for the wall art, hand marbled paper for the exposed lungs, and embroidery thread for the vein detailing that trails up to her neck and tangles around her fingers. The figure is a mix of multiple references I gathered to match the image I had in my head of what I wanted her to look like.
As I mentioned before, this year has been rough. I’d been experiencing sensations of feeling trapped, confined, constricted, suffocated … Even simple acts such as breathing, eating, sleeping were in a way loaded issues, made more complicated by both external and internal factors. This was some of what was on my mind while creating this piece, but as always it is not without elements of hope and promise of a future through the oxygen giving plants and botanical imagery throughout, and sunlight pouring in through the open window.
I’m sure others may even see something totally different in the story as viewed by their own thoughts and experiences, and if anyone wants to share what they saw going on I always love to hear others’ interpretations – Feel free to send a comment or message! Love to you all, and remember, you always hear that you don’t want to force inspiration but … sometimes you have to to get anything done and that’s okay ;).
Though I’m not letting go of the original as of right now, prints will soon be available so check out my eBay shop to snag one!
I’m Not Dead, Here’s Some New Art!
 I’m back again! I’ve been pretty quiet on here and have been taking a bit of a project hiatus in general as I go through some life transitions and changes in a couple of areas, but have completed a few smaller stand alone projects. I talked about some of my anxiety struggles previously, so while dealing with that at a higher intensity especially over this Spring and Summer, I really needed to focus on art that was purely therapeutic; not a job or another task to complete or something with an intense deadline or something that was going to take months to complete.
I am obsessed with raven imagery, and parted with one of my favorite pieces recently as a gift for my brother, a fellow creative who just bought a new home and is getting married this fall. I knew I wanted to do another similar piece, but with a bit more color this time. I lead an art therapy program for adults with varying disabilities, and see every day how creation can be a life saving force that reminds people that they are worthwhile if only because they have made something that day. Art can be a window in an otherwise dark room. Part of the art therapy aspect of my forcing myself to keep making art even when all I wanted to do was watch movies or go to sleep early after getting home for the day was to inject my own personal thoughts and feelings into the chosen aesthetic of what I was creating. In “Flight Response”, the subject’s face is deliberately calm and expressionless while the birds flying around her appear fast and chaotic. Both she and the birds are done entirely in high contrast black and white to appear connected as one entity. They could be physical manifestations, or projections of the woman’s psyche. The background being almost opposite the woman and birds, a more expressionistic landscape in bright, peaceful colors, is also deliberate. There is hope, and there can always be better things ahead. Though not always aware of it, she is in control.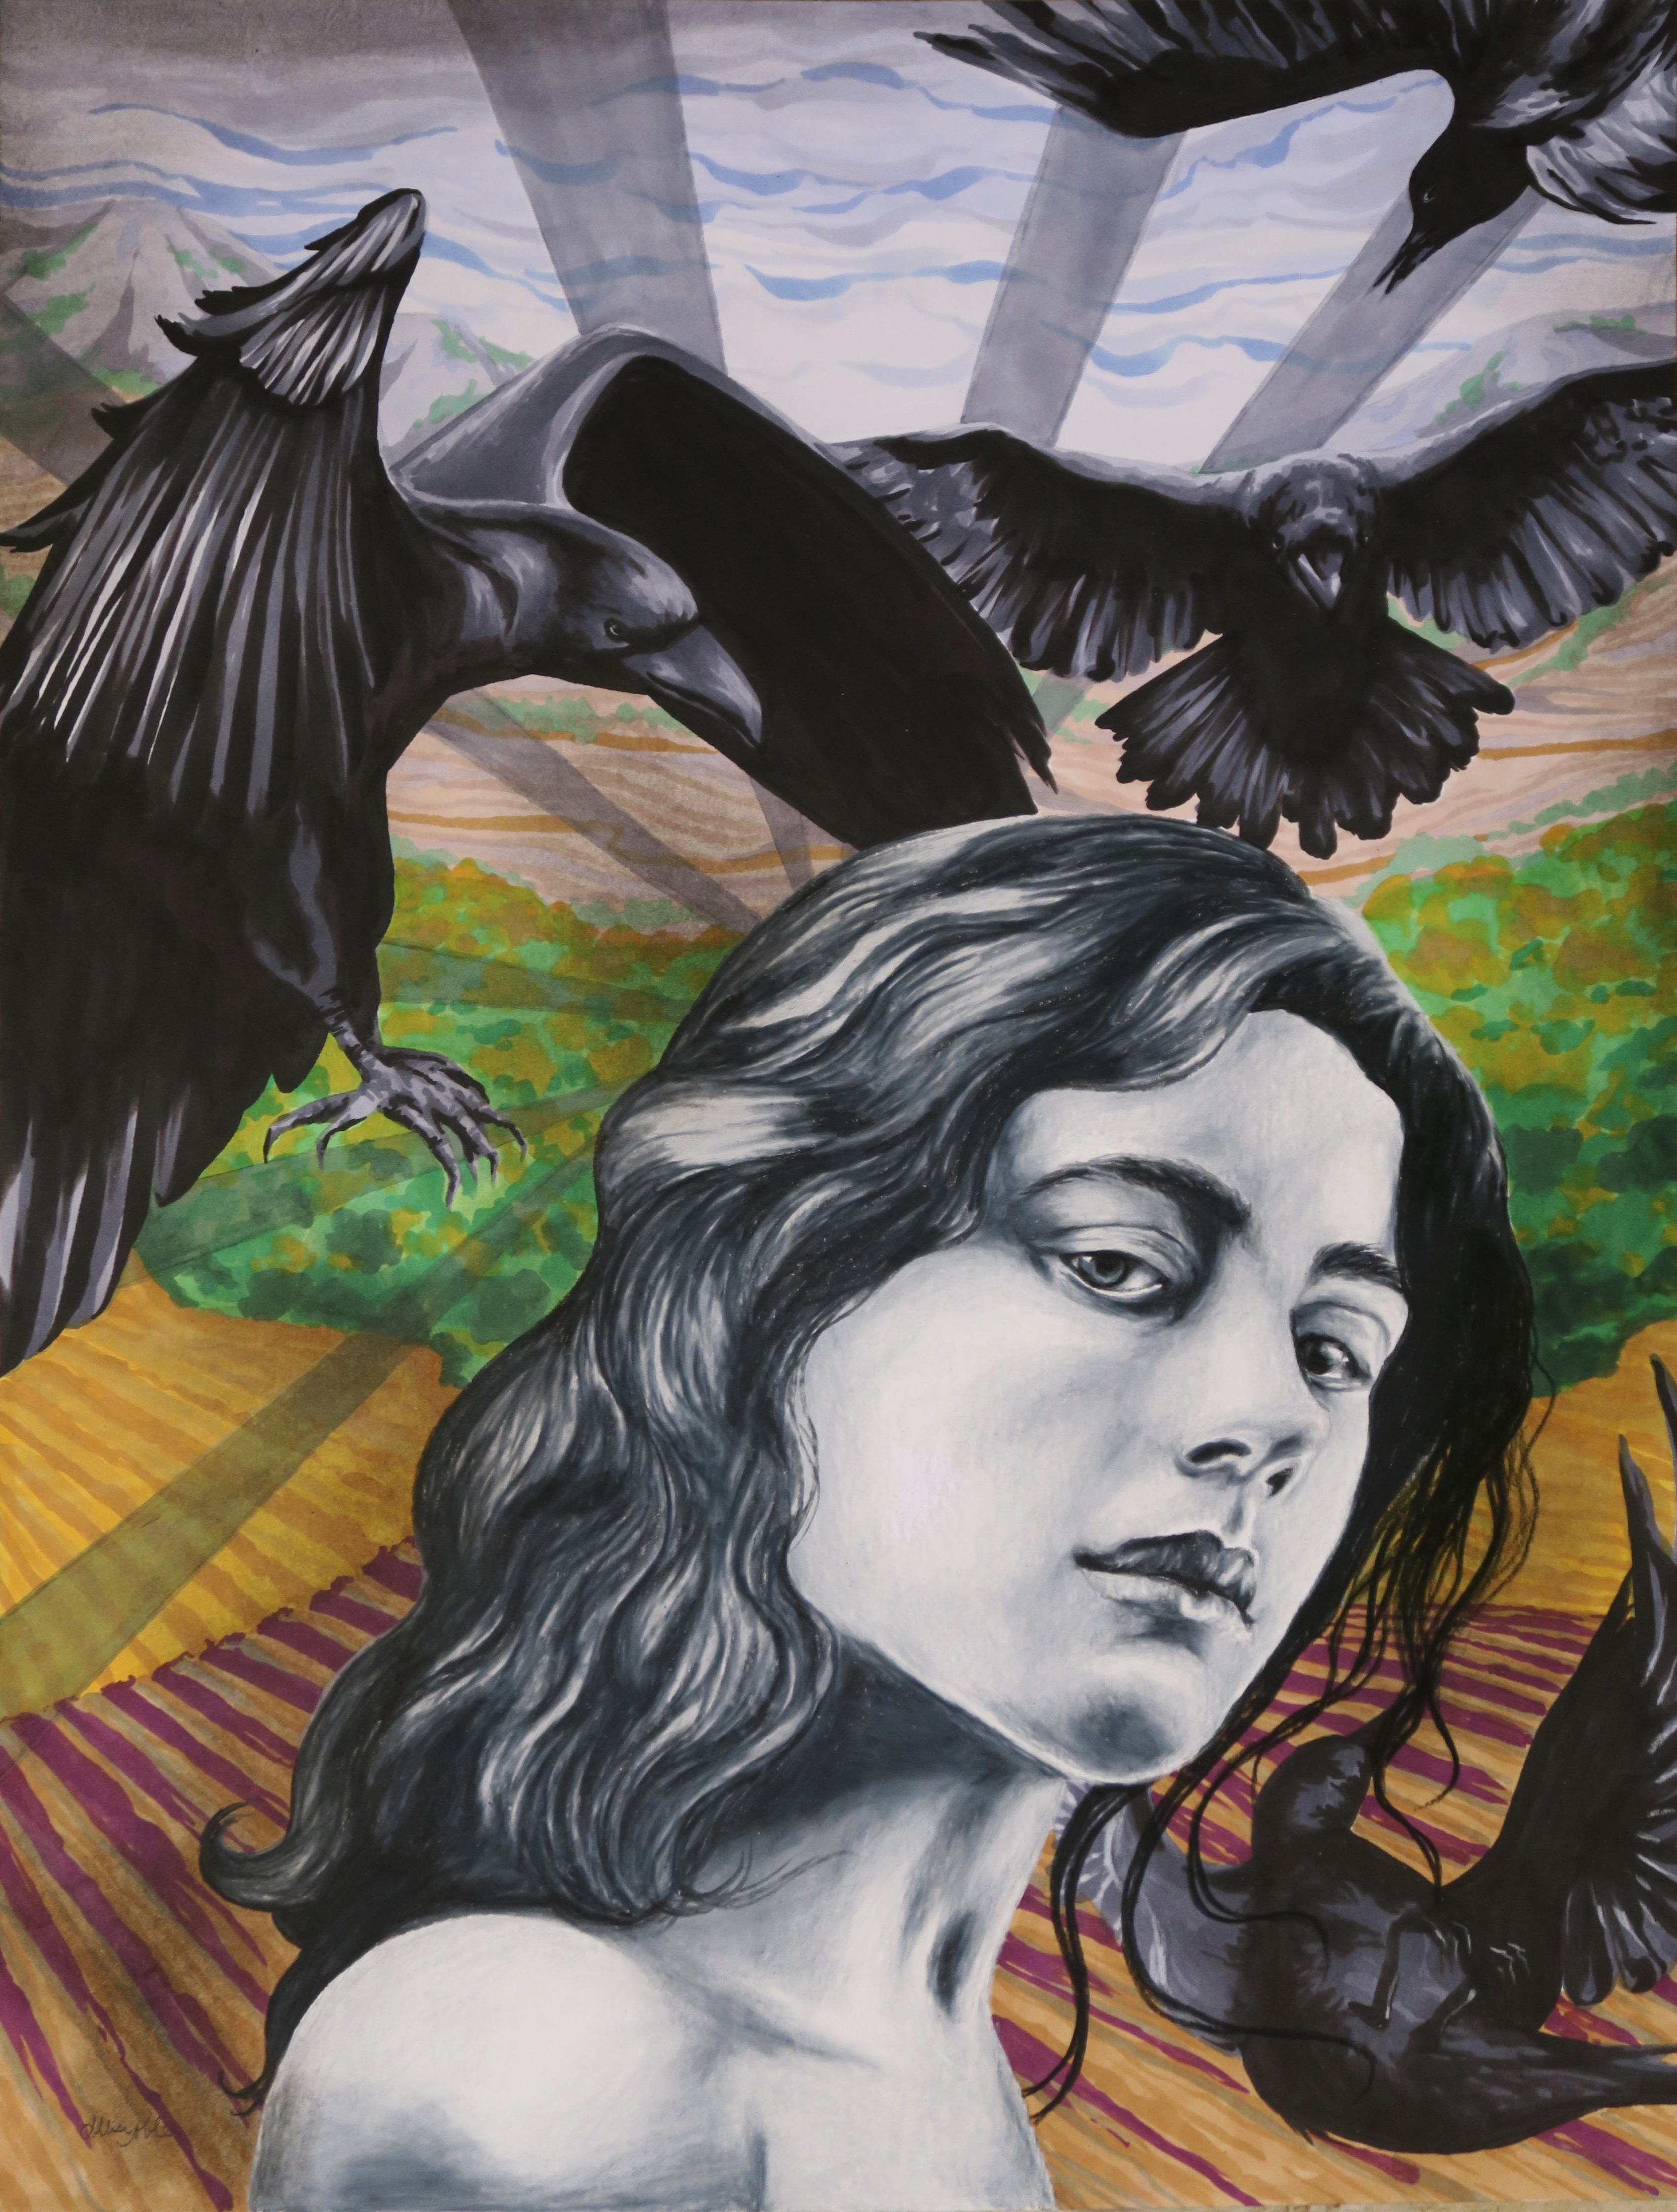
I also wanted to take the opportunity to play around with some different techniques and combinations of materials with no pressure on achieving a specific result, another important aspect of art as therapy. In “Waiting”, I tried watercolor painting on wrinkled lace, wire wrapped with yarn, embroidery, and weaving strips of hand marbled paper along with my traditional ink and prismacolor pencil drawing. Again, there is an aspect of sadness and isolation but not without a lingering hope. I aimed to craft a story based on what I was experiencing as a way to process my thoughts, but a story that is open ended so the viewer can create their own narrative as well.

As the smoke is clearing, I’m still working on my series based around color psychology and looking forward to doing more teaching again in the Fall. Both of the above pieces are available for purchase, and I’m starting early on some small and affordable Halloween-time art that will soon be posted in my eBay shop, so keep an eye out! For a time lapse of some of the background illustration for “Flight Response”, check out my artist facebook page.
