Throwback Art

Throwback Chapter 3 : Fashion Victim

Welcome to the next part in my series using the past to delve into why I create what I do… I hope others find this interesting and entertaining, and I hope it helps readers reconnect with their past selves and realize how all of those different “us-es” had a part in creating who we are today, even those versions of us we don’t like to spend too much time with.

Though you wouldn’t know it from my own childhood attire, fashion was always a large part of my artwork and I loved imagining my own clothing designs (Note me designing Barbie clothes in our home office on Windows95. Note also, I was wearing unnecessary glasses with the lenses popped out for fashion far before mid-2000s hipsters existed.) I adored designing extravagant imaginary partywear, but was also awkward and uncomfortable in my own skin. It took me awhile to ever give a thought to actually trying to look cool myself ;). Once I got into upper elementary school, I idolized the girls in Disney channel movies who rode dirt bikes and skateboards and never seemed to be afraid of what other people thought of them. I really just wanted to be a cool tomboy but I had no athletic ability whatsoever, and I did actually care a lot at that time about what other people were thinking about me, so … I wasn’t too sure what to do with that. It didn’t stop me from rocking a soccer uniform at Disney despite the fact I’d never touched a soccer ball in my life.

My parents always encouraged art and creativity, and come to find I created my first “mixed media” project with my mom, using cutouts from scrap fabric for dresses at age 4. As I got older, my designs became a bit more sophisticated and I even began naming the pieces in my collection with such enticing titles as “Wide Country Gown”, among others.

Around 15, I finally got a clue and started developing my own personal style which also filtered its way into my artwork. I got hooked on loud, unique, alternative fashion that had a retro flair, and even became a bit interested in the whole club kid aesthetic though by happenstance of my birth year I kind of missed the whole raver trend. Below on the left is what I imagined it was probably like.

I’ve been told my interest in both fashion and interior design stand out in my work, and as I mentioned in my first throwback post people have always played a central role in my art. The way individuals choose to decorate both themselves and their external environment are central to telling part of the story of who they are.

Over this year, my passion for wearable art has jumped off the page and into reality as I began designing my own upcycled clothing. This was at first dove into as a project to help my art students with disabilities lead their own fashion show, and then for myself as I realized this is something I really enjoy.

This is also the first year I had the confidence to participate in some local modeling projects for art friends, and it was an absolute blast. Expression via how I visually adorn myself has been another way I have used art as a tool for communication over the years as someone who is an unwilling introvert due to social anxiety. People are all living sculptures, for the most part wonderful and fascinating (and yes, also challenging at times), and the ability to use how we visually present ourselves to show who we are to others before even speaking is an intriguing tool.

Like with my other art, with my wearables I hope to inspire, make people smile, and help them feel confident and comfortable in who they are. My pieces are available for purchase via ebay, etsy, and facebook so pick your poison ;). Let me know what types of colors, patterns, or images make you feel the most inspired and powerful!

Advertisement
Standard
Project Ideas, Techniques and Tutorials

Vintage Inspired Christmas Ornament Crafting Tutorial

I usually wait until Thanksgiving weekend, but I couldn’t resist putting up my tree early this year ;). I love vintage Christmas decor almost as much as I love handmade ornaments, so I’ve combined my two holiday passions with this fun and simple craft. I hope you are inspired to give it a go!

This year, my main tree in the living room is covered in my paintbrush assemblage ornaments accented by bulbs in different shades of gold, some vintage pieces, and some softies gifted by friends and family. My second small tree in the spare room has all my bulbs decoupaged with images from art magazines. And of course, I have my own vintage jewelry tree hanging up in my kitchen! I did some tutorials showing my process for both the paintbrush ornaments and trees using old junk jewelry pieces last year, so be sure to check those out if you need some inspiration. I know for me, crafting these decorations has been wonderful art therapy in between my more taxing commissioned pieces, gifts, and pieces for upcoming shows. I know it can be difficult, but I hope you all take some time near the end of this year to reflect and unwind, and remember holidays are supposed to be fun – don’t pressure yourself too much or feel you have to stick to traditions that don’t work for you. Make these next couple months what you need them to be. ❤

sdas

Standard
Artist Bio, New Work

Art And Outreach

I know I’ve lapsed lately on my writing … since Mother’s Day actually, and I only realized how long it has been when I was preparing a Father’s Day project post for Sunday ;). I’ve been continuing to spend a lot more time teaching and working on some unique commissions, but I certainly haven’t been sacrificing my own creative spirit for “work” as some might assume. I have enjoyed the shift as a way to recharge and do some new and different things, and stretch my own personal style into new avenues.

The bulk of the first quarter of this year was spent preparing for a Fashion Show with my Express Yourself Artshop Program. The theme was upcycling thrift store clothing, perfect for the big reveal on Earth Day. The majority of my students are adults with disabilities, and I was amazed to see how they took to this project. Some who struggled to create imagery on canvas or paper created breathtaking designs when given a piece of suede to paint on or a pair of jeans. Fashion shows and pageants for people with physical and intellectual disabilities have definitely come into the spotlight more as our society has begun to demand more diversity in the bodies we see in fashion, film, and advertising. What I especially loved about our show is the fact that the focus was on what our students made, not just “looking pretty” (although our students did look fabulous showing off the clothing they created!). It was very ‘come as you are’, models didn’t have to wear makeup or fancy shoes if they didn’t want to, or do their hair a certain way. Everyone was invited to show up as their authentic selves and just have fun. This was a huge leap of confidence for our student ladies that participated along with our staff and some models from the community, and I could not be more proud and impressed.

The second big workplace project that is still in progess was planning a community mural incorporating themes from the students’ artwork. It was difficult for super detail oriented me to put together a design that would be accessible enough for community members of all ages and abilities with little to no art experience to come and paint and not have it look crazy ;). I payed homage to my love of retro illustration to come up with a design that was very simplistic, but still had an artsy vibe.

My life has been filled with color lately as I also progress on a very unique commission, a cosplay sword and shield accented in PINK leather! Just a teaser for now, I will share the finished products soon!

Though art is an intrinsic expression of the artist who creates it, oftentimes it is about so much more than the individual artist. We all have preferences for how and what we prefer to create, but sometimes art is about lifting others up into the spotlight. Sometimes art is about using our skills to help someone else’s talent and creativity grow. Sometimes art is about helping someone else’s vision come true that may be creative, but doesn’t have the tools to make their idea a reality. Sometimes art is about creating in isolation and baring your own unique soul, but sometimes art is also about outreach. As one who has often been the former, I’m enjoying this exciting new chapter.

Standard
New Work, Techniques and Tutorials

Hand Drawn Damask Print Demo

I am a big fan of damask print. I know the design had a big moment about half a decade ago, but I’ve always loved it, especially since under the pattern umbrella there is so much variety. I always thought a snake would lend itself well to the curving, scrolled shape of a damask print but could never quite find exactly what I was looking for. When you can’t find the print you want, it’s time to make your own!

I used metallic ink and prismacolor pencils on black pastel paper that has a visible cross hatched texture to the surface. Since this sort of print only has one element to it that is repeated in an offset pattern, this was a relatively simple one to try for someone who is newer to creating all-over print.

I’m thrilled with how my snake damask turned out, and can’t wait to order a skirt or shirt for myself. To see more of my designs, visit my Redbubble Shop. Redbubble’s products are all reasonably priced and excellent quality – these art-covered wares make perfect holiday gifts. If you enjoyed the video showing how I created my print, please give me a follow! I will be posting some fun palette knife painting tutorials in the coming weeks as the weather gets colder and we find ourselves needing more indoor forms of entertainment.

For all my American friends out there, enjoy your Thanskgiving week, and thanks for stopping by my creative little corner of the world :).

Standard
Techniques and Tutorials

Make A DIY Bib Necklace

I’ve shared my fun mixed media necklaces I’ve been creating in the past, inspired by a class project the week my Creative Minds students learned about artist Sonia Dealunay. Today I wanted to show you the creative process firsthand!

I use a lot of castoffs and odds and ends like scraps of jewelry chain and fabric, discontinued upholstery samples, and pieces from broken jewelry. Antique stores, thrift shops, garage sales, and ebay are all great resources!

I love how fun and unique you can make these necklaces, collaging in any shape you want though I’ve stuck with the classic bib collar design for now. Most of mine are very nature inspired but again, you could take something like this in a whole different direction. The possibilities are endless! I hope some of you are inspired to play around, but for those who’d rather just buy one I do sell the necklaces I make in my ebay shop.

As always, if you have any questions shoot them my way. Happy creating!

Standard
Art Education, Project Ideas

Kintsugi – Creative Minds Art History Project

I’ve always loved Kintsugi pottery not just for its striking visual interest but also for the symbolism behind it. Kintsugi means “golden joinery”, and is a practice that started as early as the 15th century in Japan. With Kintsugi, artists fix broken pottery by using a special lacquer mixed with powdered metals to join the pieces back together. Influenced by the Japanese philosophies of wabi-sabi (seeing beauty in imperfection), mottainai (the regret of wasting), and mushin (the acceptance of change), Kintsugi pottery highlights flaws rather than hiding them, showing each piece’s unique history and turning brokenness into beauty. Our experiences, mistakes, scars, and the things that make us different are what build us into who we are, and beauty can be found in all of these things as we move forward.

I knew I wanted to incorporate learning about Kintsugi into my Artshop class, but the question was how? In this class, we typically do different small projects each week, so it would need to be something that could be completed in an hour and a half. Additionally, I have no background in pottery or sculpting (100% 2D artist over here!) and wanted to use supplies our studio already had on hand without depleting our clay class’s supply. A couple of months ago, a group of friends I do crafty girls nights with and I found an idea to make small, marbled ring dishes out of polymer clay on Pinterest. This craft got me thinking … why not make sculpey pottery?

It took some trial and error, but I ended up coming up with something that works using sculpey, a cool whip container and some 4″ diameter and 3-3.5″ diameter oven safe glass storage containers, hot glue, and broken teacups.

The first step was to roll out a sheet of clay to the desired size. Students mashed, twisted, and striped their different colors together and then rolled them out to about 1/2 cm thick. We happened to have acrylic polymer clay rollers, but a rolling pin would work just as well – Just make sure to put a piece of foil or parchment paper over the clay so it doesn’t actually make contact with the rolling pin if you ever want to use it for food again. Next, they cut out a circle by tracing around a template using an xacto knife. We used an empty cool whip container as a template for students who wanted a 4″ diameter bowl, and a 4″ glass container as a template for students who in the end wanted a smaller 3.5″ bowl.

IMG_20190528_150010Once everyone had their flat circle, we placed our chosen glass containers open side down and centered the circle of clay on the base of the container. We then gently guided the sides of the circle  down to form a bowl shape, being careful not to press the clay down too tight (This makes it easier to remove later!), and not to press hard enough to leave fingerprints.

After this, we made a selection of teacup fragments from our stash. We then laid them where we wanted on the surface of our clay bowl shape, and traced around the fragments with an xacto knife, cutting out an empty space into which we could glue the piece once the clay was baked. Some pieces were more curved than others, so this also influenced placement. The holes can be a bit bigger than the piece, because we can fill any gaps with hot glue – You just definitely don’t want the hole to be smaller.

Once the spaces were cut we baked the clay on the oven safe glass containers, still open side down, in the oven per the instructions on the sculpey package (275 degrees for 15 minutes). After letting the hardened clay cool, we were able to use hot glue to fill in our bowl with the teacup pieces. Once the glue has hardened and is painted with metallic gold acrylic, it looks just like the fusing used in traditional pottery!

These make for interesting decorative bowls or catch-alls, and though our process and materials were quite different, it was a fun way to reinforce the history lesson. My hope is that these tiny vessels will sit out somewhere as a reminder for people to love themselves, cracks and all, and remember that no one is ever broken beyond repair.


Standard
Project Ideas

Piet Mondrian – Creative Minds Art History Project

piet.mondrianI promised I’d catch up in posting all my Creative Minds art history projects from the Fall and Winter semesters!

You may not recognize the name “Piet Mondrian“, but I guarantee you’ll recognize his imagery. Mondrian was interested in simplifying art down to its basic essence, and creating a type of universal design that could be used for everything: visual art, furniture, architecture, clothing … I’d say he was pretty successful, as his primary colored designs composed out of different sized squares and rectangles bordered by bold black lines can be found covering posters, furniture, jewelry, shirts, and the pair of Nikes I would buy if I were rich.

We do a lot of painting in the Express Yourself Artshop program, so though we easily could have done the whole “make a grid on canvas with blue painter’s tape” thing, I wanted to try something more original – transferring a Mondrian design onto glass. The glass we used was just glass from the inside of an inexpensive frame. This could be done in any size. The actual frame could easily be used on a future project. We used primarily colored tissue paper for our rectangles, though we happened to have a bit of patterned and textured vellum on hand that can be found in the scrapbooking section of craft stores and is great for mixed media art. The goal is to use thin, transparent paper so light can shine through the glass. I cut a variety of different sized rectangles and squares out of scrap cardboard for students to use as a pattern. Students chose their colors, and then traced different shapes using the patterns until they had a good pile to choose from. They then laid out their shapes on the glass to create the desired pattern. After they were happy with their design, it was time to glue. We just used traditional liquid school glue, but squeezed the glue out on a piece of foil and used a crappy paint brush to paint the glue on the back of the paper so it didn’t get too saturated.


The front of the finished product is going to be the glass side without anything glued to it, so if you do end up using papers with a one-sided pattern, you need to glue the side you want to see face down. Once the paper dried, we trimmed any paper that was hanging off of the glass and used a ruler to draw on the glass side (NOT the side the paper was glued on to) with a black, medium tip paint marker. This sharpens and finishes the design, and also disguises any uneven edges.

These can be as simple or as intricate as you want, and are a fun project with a beautiful end result that can be completed fairly independently by all ages and abilities. My students with disabilities who struggle with dexterity were still able to do this on their own and end up with a piece of art they were proud of. Display in a clear plastic plate stand … It would be especially cool in front of a window or other lighted area. Have fun creating :)!

Standard
Interior Design, Project Ideas

Back After Design Overload!

Ok, so I have not posted at all really in the last 2 months. Shown below is the reason why…

I mentioned in my long ago previous post that my boyfriend and I had just purchased our first home. Well, as you can see the interior is pretty retro, though sadly not in the cute, hip, etsy sort of way. We have been doing a lot of DIY renovations, and though stressful and time consuming, it has also been such a rewarding experience to put my design skills to the test and recreate a whole house interior to my own specific tastes (Well, almost my own. There was my boyfriend to consider as well, and yes, there were fights, but we still love each other <3.). It’s hard to believe it was only a year ago I was working with my parents on their bathroom renovations. Granted, my budget as a just starting out 20-something was quite different ;), but that’s where creativity comes in! Our home hardly resembles these before pictures now, and we are nearing the home stretch. I don’t want to post any photos until everything is completely transformed, so be sure to check back later for the big reveal.

I am a person who fancies many different aesthetics, so the hardest part was deciding exactly what way we wanted to go with our renovation. Here are some of my favorite DIY renovations I’ve spotted for each major room.

Living Room

modern-white-blowing-font-b-tree-b-font-font-b-wall-b-font-font-b-decal

Trees and other nature forms are one of my favorite accents for interiors because their shapes and sizes are limitless, and at least for me, bringing the outdoors in has calming qualities. Decals including the one shown above are available everywhere online, but can be pricey (This one would end up totaling $150 for all 3 pieces.). Simple branch forms are something even a non-drawer can put on their wall if they make a pattern or outline on the wall before painting. When you do it yourself, not only do you save money but you have more control over the color and shape of your design. A wall design should fill blank space to make a room look more balanced, and compliment the arrangement and flow of the furniture placement, as seen above.

Kitchen

If you spend any time on Pinterest, you will know that Scrapbooking paper has become as all purpose as duct tape. You can even use it to create a unique, artsy looking backsplash. Tile can be ultra expensive, but you can still get a fun tiled look using squares of scrapbooking paper, affixed and sealed with mod podge or any other clear sealer. From my experience, mod podge can sometimes still have a slightly “sticky” feel even after cured. There are a variety of other slightly more expensive sealers available at any local craft store that provide a better finish. It is key to use a gloss finish so any food splatters can be easily wiped off, and to remember that if your surface your are affixing the decoupage to is bumpy or rough, your finished design will be bumpy and rough. Sanding is your friend when affixing any sort of backsplash :).

Bathroom 

1420874190735

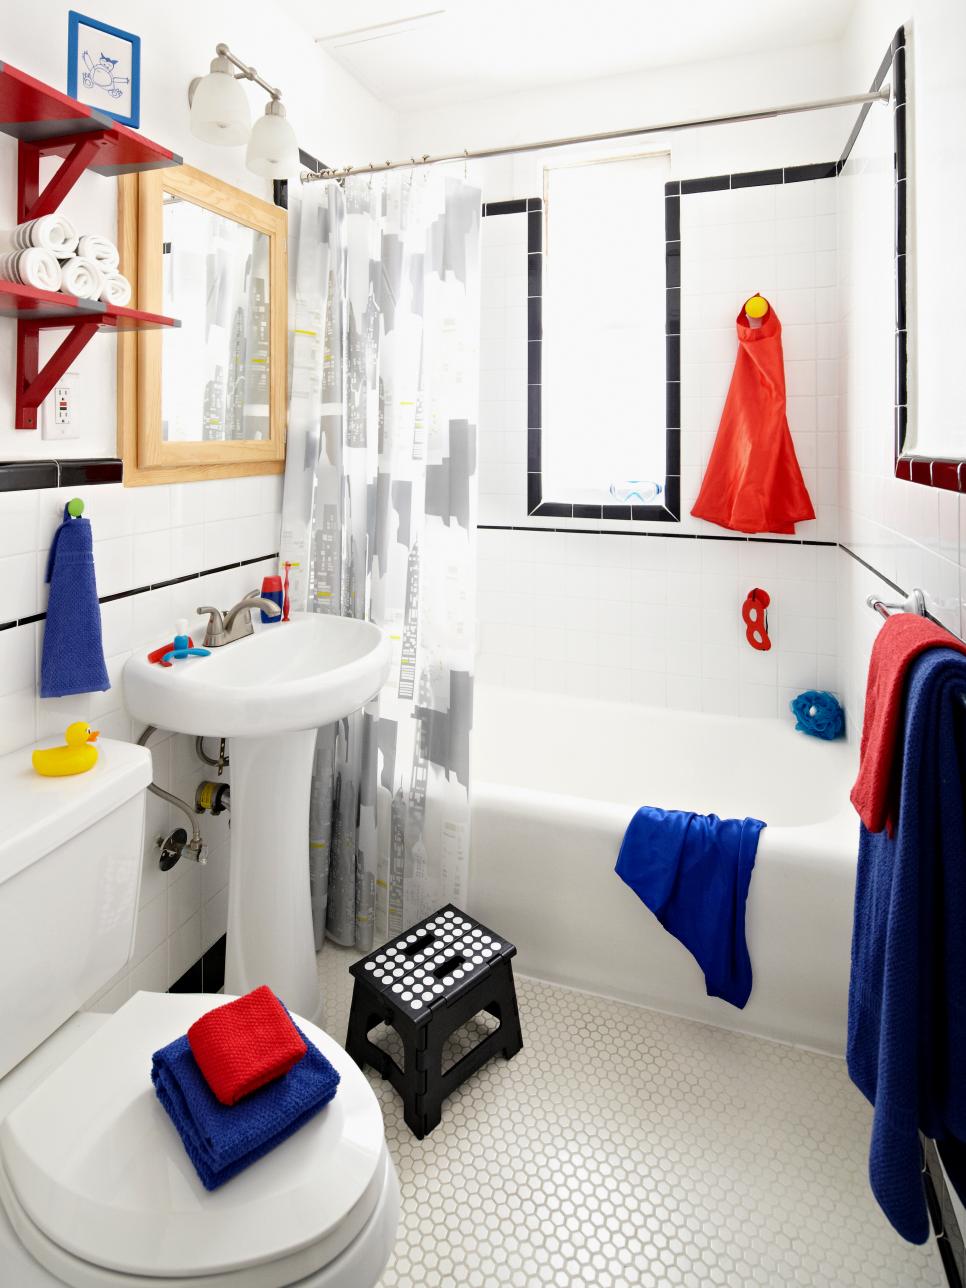
What’s great about this superhero themed bathroom from DIY Network is that once you repaint the shelving, change the accents, and switch out the comic book style artwork it can be re-themed at the home owner’s whim. I am a big fan of leaving the bones neutral so that you are not locked into a certain theme or style forever. Though this design was themed as a “little boy’s” bathroom, I personally believe it could also be a fantastic adult woman’s bathroom ;), and was actually planning on doing a superhero themed bathroom in our house until we happened to find a home with dreamy vintage floral wallpaper that we wanted to save.

Bedroom

our-humble-abode-blog-guest-bedroom

For whatever reason, I hate headboards. However, I am obsessed with finding ways to add extra shelving and storage in general. My boyfriend and I are both bibliophiles, so I thought this unique setup from Better Homes and Gardens was a great way to provide adequate shelving for books while staying space efficient, and giving a finished headboard look by bordering the top of the bed with blank wall. The sconces for extra reading light are a great functional idea as well.

Office

If you love color but don’t actually want to commit to rainbow walls, taping up paint swatches is an easily changeable idea. I love the creative genius vibe from the picture on the left, and can easily imagine notes and project ideas scribbled on each of the swatches as well, using the decoration as a kind of living idea board. If you find that look too chaotic, there is the more contained, orderly version on the right.

The final step in any interior re-do, which I will be starting on soon, is filling in with finishing touches such as artwork and other decor. These small final details often make the biggest impact in your space. Don’t just buy canvas prints from Bed Bath and Beyond, it is worth searching the online marketplace for original designs by working artists that are oftentimes more affordable and so much higher quality than mass produced, big box store pictures. Some wonderful sites include Redbubble, Society6, Zazzle, Ebay, and DeviantArt. It’s also worth checking out the Facebook marketplace if you use Facebook. I sell original artwork and prints on many of these sites, and have included links below. I also work with my art students, who are primarily adult artists with disabilities, in empowering them to market and sell their artwork in both our organization’s Ebay Store and Redbubble Shop. Besides art prints, many of the students enjoy glass and ceramics painting which make for great one-of-a-kind accent pieces.

Happy designing!

My Moongirl Designs Redbubble Shop

Moongirl Designs Ebay Store

Moongirl Designs Zazzle Store

Moongirl Designs Society6

Standard
Artists To Know

My Top 10 Favorite Shops On Etsy

I love Etsy. Though I myself have found far more success selling my own art on ebay, I do a lot of buying from Etsy ;). Around the holidays and birthdays, I try to get a lot of my gifts from places like Etsy or Ten Thousand Villages, or any local handmade shops because handmade items are always going to be unique, made well, and your purchase will actually brighten someone’s day and be an encouragement to the actual artist behind the product. Without further ado, here are my personal 10 favorite Etsy shops.

Nuptse

il_570xn-699369956_2bpc

This shop features beautiful, detailed bead-work all handmade in Kathmandu, Nepal as a way for the women there to be able to support themselves and make an income. This handmade business has also recently made an alliance with Hoste Hainse, a non-profit that focuses on women empowerment and sound working conditions for women, as well as education and daycare for their children.

PixieColdArt

il_570xn-560066372_l9j3

This shop offers super affordable prints of gorgeous artwork in the artist’s bold, colorful, high contrast style. These often surreal female and animal portraits are captivating, and definitely represent my personal favorite style of art.

SparkleBeastDesign

il_570xn-588914090_kfz0

Can you tell I like bright colors yet? The jewelry found at Sparkle Beast is like an elementary school art room closet collided with another closet full of “night at the opera” evening wear. I mean that in the best way possible. It’s like an upscale version of let’s-play-dress-up, and it is amazing.

nashpop

il_570xn-409615821_mvsm

Again with the bright colors, this shop takes old chipped, damaged, or otherwise hideous figures from secondhand stores and spray paints them in brilliant colors to turn them into fun, modern, pop art decorations. I am the proud owner of one of the most epic nativity scenes I’ve ever seen, shown above, and it is my favorite Christmas decoration I own.

CrimsonEtClover

bearearsDSCF4590

Crimson Et Clover is the wonderful inventor of the modern marvel called “bEARwarmers”, which I am rocking in the above picture. I’m a big fan of how they keep your head warm without messing up your hair. Also, the whole bear ears part.

MarisolSpoon

il_570xn-217266807

This artist’s paintings just make me happy when I look at them, simple as that. She incorporates a lot of nature and vintage-style imagery into her pieces, which are two things I cannot get enough of.

berkleyillustration

il_570xn-196303180

And the same to you, Sir Cheetah with an eye patch. Berkley illustration is one of the most fun shops around. Their personified animals aren’t just hilarious, but so detailed, realistic, and well done. I own the above bottle opener myself, because who would pass up the opportunity to toast with a swift jungle cat?

ohgoshcindy

il_570xn-836697027_mgoq

This shops features spot-on watercolor illustrations of pop culture icons, coupled with their well-known quotes and catch phrases – a dream for any tv or movie lover.

CartBeforeTheHorse

il_570xn-933747095_ivez

This shop’s contemporary folk art has such a distinctive and unique style, I’d recognize it anywhere. I think it’s the faces that first drew me in. The designs are whimsical and fun without looking childish, and incorporate a vintage touch.

JooSweetie

il_570xn-798162992_638p

joosweetienecklace

Look! She even has a hair bow. What could be better?


This shop styles lovely jewelry pieces around the artist’s adorable hand-painted faces. I raved about her artistry in an earlier post, and as of right now own one of her pieces (notice I said as of right now 🙂 … more to come!).

There you have it. It was unbelievably hard to narrow my list down to just 10. If you want to see more of my favorites and collections, you can follow me on Etsy. If any readers out there have Etsy shops of your own, feel free to leave a link in the comments and I will check it out! I am always looking for more shops to peruse.

Standard
Art Education

Happy “Inspire Your Heart With Art” Day!

Happy “Inspire Your Heart With Art” Day everyone! As I’ve told you before, I love holidays – I mean really love them. There is always that slight letdown after the marathon of nonnstop holiday excitement from Halloween to Thanksgiving to Christmas to New Years … Who knew there was this fun little holiday to tide us over until Valentine’s Day and Easter? I cannot believe I just learned of its existence this year … !

What a perfect opportunity to send some inspiration out into the world through sharing what my students have worked on throughout the beginning third of my first full semester as program coordinator for Express Yourself Artshop at Creative 360. My students pretty much feel like family members at this point, and I know I mention them a lot. But, for those new to the blog, Express Yourself Artshop is an inclusive arts and wellness program open to all students, including those with physical, mental, and psychological challenges.

I’ve worked with the program as an instructor since it was first established, and I am blown away by seeing how each student has grown since we first met a little over 2 years ago. Without further ado …

A snapshot of our amazing watercolor class! Everyone has such different styles and interests, so it is fun to see what each student comes up with.

Next, the gallery of Heather D.! I call this student and friend my “artistic soulmate” because we share a love of fashion, big eyed girls, and everything retro and vintage inspired.

Our classes are not all about art for your walls. Tons of cool functional and awesome looking wares are being created in our Woodshop class this semester as well. I love this log cabin inspired bird house, I think because it reminds me so much of childhood Lincoln Logs!

It is so much fun to be able to decorate your home with handmade pieces that are unique, and that no one else will have. You don’t have to be what people think of as a traditional “artist” to do it. The top two pieces, by Colleen D. and Amber E., are canvases wrapped in fabric with a cutout from an art print collaged overtop. The wreath below can be created easy and stress free with any medium sized to large craft punch, a wreath form, a free afternoon, and a lot of hot glue sticks handy.

Proud smiles!

Creating, whether your goal is to become a world famous artist or just to calm your mind and relieve some stress, is a HUGE confidence booster. It is also an important tool of communication and self expression, speaking from experience myself. I challenge all of you to try to make at least one thing today, even if it is just a doodle. Happy inspiration!


Standard