I do wait until Halloween is done at least, but once November hits I feel myself sliding into holly jolly mode and the older I get, the more I enjoy seasonal crafts :P. This year I played around with some fun clay ornaments and even taught a couple of workshops already! I also wanted to take the opportunity to share some other fun holiday demos I’ve done over the years. All of these projects I’ve used to decorate my own house, and have also been successful selling at art fairs and online.
I was always enamored by these jewelry trees when I’d see them at antique stores, and once you get the hang of how to lay them out they are relatively simple to create at home. It’s even more fun when you get to choose meaningful collected bits and pieces, or create your own “theme” or color scheme. I have made these in so many different styles – each one really is one of a kind!
Inspired after trying the trees, I decided to go to work on my old, mangled dollar store chip brushes. I have done an entire tree with these and it is so striking! Some people who have bought these from me have even hung them on their wall as a point of interest amongst a collage of framed photos.
How fun would it be to do a “family tree” with old photos using this style of ornament? Van Gogh is still my only version of these, but I really need to set aside the time to make more as I still have a bunch of sparkly pipe cleaners!
Resilient and cute is always a winning combination. These plush ornaments are kid, cat, and oopsie proof!
It’s almost December! I know this time of year can get so busy and stressful, but trust me taking even 5 minutes a day doing something creative will make all the difference in your mental health. I hope these demos inspire you, and feel free to reach out if you hit any snafus or have questions!
I usually wait until Thanksgiving weekend, but I couldn’t resist putting up my tree early this year ;). I love vintage Christmas decor almost as much as I love handmade ornaments, so I’ve combined my two holiday passions with this fun and simple craft. I hope you are inspired to give it a go!
This year, my main tree in the living room is covered in my paintbrush assemblage ornaments accented by bulbs in different shades of gold, some vintage pieces, and some softies gifted by friends and family. My second small tree in the spare room has all my bulbs decoupaged with images from art magazines. And of course, I have my own vintage jewelry tree hanging up in my kitchen! I did some tutorials showing my process for both the paintbrush ornaments and trees using old junk jewelry pieces last year, so be sure to check those out if you need some inspiration. I know for me, crafting these decorations has been wonderful art therapy in between my more taxing commissioned pieces, gifts, and pieces for upcoming shows. I know it can be difficult, but I hope you all take some time near the end of this year to reflect and unwind, and remember holidays are supposed to be fun – don’t pressure yourself too much or feel you have to stick to traditions that don’t work for you. Make these next couple months what you need them to be. ❤
I was first drawn to Charley Harper‘s work in the gift shop of a local museum. One of my dad’s main hobbies is birding and wildlife photography, and Harper’s Mid-Century-Modern style illustrations just screamed the perfect birthday gift.
Harper grew up on a farm in the Midwest, and was inspired by the wildlife he experienced around him. He called his style “minimal realism”, taking in the world around him and distilling the imagery he observed down to the most essential details. He said, “When I look at a wildlife or nature subject, I don’t see the feathers in the wings, I just count the wings. I see exciting shapes, color combinations, patterns, textures, fascinating behavior and endless possibilities for making interesting pictures. I regard the picture as an ecosystem in which all the elements are interrelated, interdependent, perfectly balanced, without trimming or unutilized parts; and herein lies the lure of painting; in a world of chaos, the picture is one small rectangle in which the artist can create an ordered universe.”
Inspired by images from Harper’s body of work that capture his signature style, I encouraged my students this week to create their own minimal realist birds. Though Harper’s works were painted, they bare quite the resemblance to modern day digital art and graphic design. Instead of painting, we used a collage format to create our Charley Harper Birds. We used paint chip samples for our vibrantly colored creatures, colored cardstock for the background, and paint markers to add the linework details. From working on repainting the interior and exterior of a house over the last couple years, I had an accumulation of samples but never felt right throwing away even the colors I ended up not using. Upcycling to the rescue! At an arts non-profit, we love free materials ;). We outlined our geometric shapes onto the samples with a pencil, then cut them out and adhered them to a foam core board base (any heavier paper would work as well) with a standard glue stick. I’d suggest laying out the entire design before gluing in case you want to make some changes before the final masterpiece.
I teach adults with varying physical, psychological, and intellectual disabilities but this project is perfect for all ages and abilities. It is all inspired by simple geometric shapes and blocks of color, and can be done as simple or with as much detail as the artist desires. We created our works in an easy-to-frame 5×7″ size.
I hope you are inspired to try this at home (This would also be a fun project for bored kids, hint hint 😉 )! This is a simple, whimsical project that you don’t have to be an “artist” to enjoy. Unwind after work and get crafty with some basic, easy to access materials. As always, if you end up making one of these yourself I’d love to see pictures!
So, I just learned that Mermay was a thing in the online arts community. Ironically enough, I’ve jumped on the Disney Plus bandwagon over quarantine and just finished watching The Little Mermaid for the first time in probably over a decade :). Though I have too many projects going right now to fully participate in the daily mermaid art prompts, I did create a fun demo that will show you how to paint a simple, adorable mermaid with watercolors. No art experience necessary! This is a fun and quick project for all ages and skill levels. You will need: Watercolors, watercolor paper or a heavier paper that can survive getting wet, and a variety of sizes of round brushes.
Despite my being late to the Mermay party, I must have still had mermaids on the brain because I also recently adapted my original human girl plush doll pattern to create some stylish mermaids!
These new mermaid friends along with a huge selection of original art and other goodies will be shown in a Virtual Live Art Show on facebook tomorrow at 6 pm. Be sure to mark yourself as going or interested in the event to get a reminder when I go live! This show will benefit Express Yourself Artshop, the inclusive program geared towards adults with disabilities and mental health issues that I lead. Help us ensure we are ready to rock once we are able to safely open again, and get your hands on some original works at way discounted prices.
If you enjoyed this demo, I am still doing watercolor and ink paintings live each afternoon from my Artist Facebook Page, so you can check that out as well. As always, if you end up with questions after trying this demo feel free to ask, I’d love to help. Hope to find you visiting the show tomorrow!
I promised I’d catch up in posting all my Creative Minds art history projects from the Fall and Winter semesters!
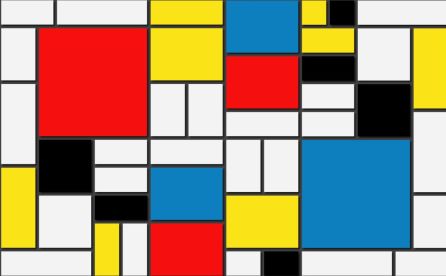
You may not recognize the name “Piet Mondrian“, but I guarantee you’ll recognize his imagery. Mondrian was interested in simplifying art down to its basic essence, and creating a type of universal design that could be used for everything: visual art, furniture, architecture, clothing … I’d say he was pretty successful, as his primary colored designs composed out of different sized squares and rectangles bordered by bold black lines can be found covering posters, furniture, jewelry, shirts, and the pair of Nikes I would buy if I were rich.
We do a lot of painting in the Express Yourself Artshop program, so though we easily could have done the whole “make a grid on canvas with blue painter’s tape” thing, I wanted to try something more original – transferring a Mondrian design onto glass. The glass we used was just glass from the inside of an inexpensive frame. This could be done in any size. The actual frame could easily be used on a future project. We used primarily colored tissue paper for our rectangles, though we happened to have a bit of patterned and textured vellum on hand that can be found in the scrapbooking section of craft stores and is great for mixed media art. The goal is to use thin, transparent paper so light can shine through the glass. I cut a variety of different sized rectangles and squares out of scrap cardboard for students to use as a pattern. Students chose their colors, and then traced different shapes using the patterns until they had a good pile to choose from. They then laid out their shapes on the glass to create the desired pattern. After they were happy with their design, it was time to glue. We just used traditional liquid school glue, but squeezed the glue out on a piece of foil and used a crappy paint brush to paint the glue on the back of the paper so it didn’t get too saturated.
The front of the finished product is going to be the glass side without anything glued to it, so if you do end up using papers with a one-sided pattern, you need to glue the side you want to see face down. Once the paper dried, we trimmed any paper that was hanging off of the glass and used a ruler to draw on the glass side (NOT the side the paper was glued on to) with a black, medium tip paint marker. This sharpens and finishes the design, and also disguises any uneven edges.
These can be as simple or as intricate as you want, and are a fun project with a beautiful end result that can be completed fairly independently by all ages and abilities. My students with disabilities who struggle with dexterity were still able to do this on their own and end up with a piece of art they were proud of. Display in a clear plastic plate stand … It would be especially cool in front of a window or other lighted area. Have fun creating :)!
As we get close to Christmas, I have no clue what kids today are asking Santa for! I don’t have kids myself, and don’t know many people with young kids. Also, 3-year-olds seems to have smart phones and tablets now, so … Do they still play with toys? Who are they planning to call, Big Bird? I have so many questions. All that aside, toys can be tools that help kids develop their interests and explore what they may want to be or do in the future. In homage to 90s nostalgia and the time when toys were still not quite high-tech, I’ve compiled a list of the best art and design toys from when I was a kid. I’m sure a lot of these will look familiar to many of you! And so our trip down memory lane begins…
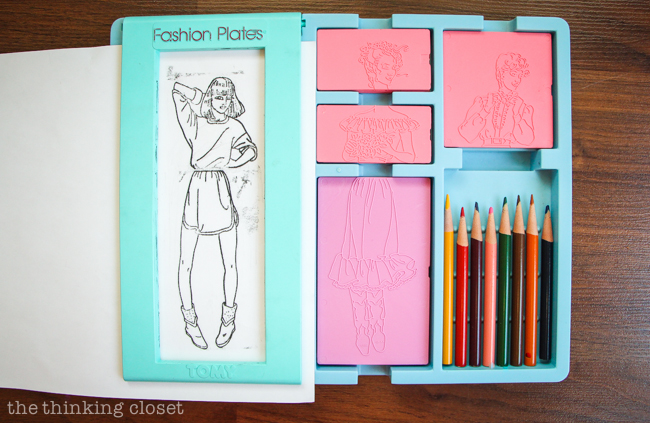
Fashion Plates
This toy let you be a high-class big name designer, mixing and matching your own styles with plastic stencils you could shade over with a magic black crayon and then render in your favorite color story. That woman with the bob, chunky bracelets, and boots is basically the me of today. Check out that dapper lady on the top right adjusting her bow-tie!
Blush Art
First off, this commercial is just nauseating. That aside, this was a fun toy, again utilizing stencils so even those terrible at drawing could be a star, thus preventing any destroyed self esteem. I had the fashion design stencil set for this rather than the ones shown in this video – I was obviously a bit singularly focused. I liked my clothes far better than cuddly creatures, but I’m no Cruella de Vil, just cursed with being allergic to anything fuzzy.
Crayola Stampers Markers
You could make some wacky mosaic drawings with these markers, case in point the self portrait on the right, circa 8 years old. Remember the 70s revival yellow smiley face craze around that time? Those guys are in there.
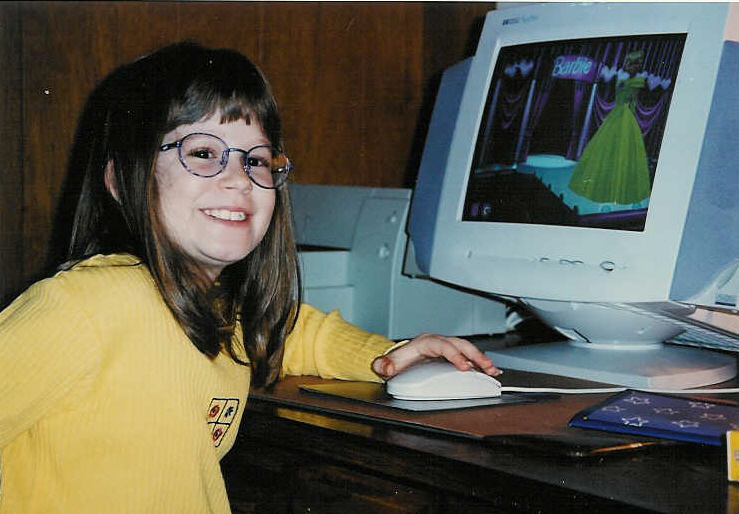
Barbie Fashion Designer PC Game
Again with the fashion designing … I honestly did consider this career path but alas, discovered later on that I hated sewing.
As you can see, the earlier self portrait was pretty spot-on.
Nickelodeon’s Mix ‘N Spin
I never had this, but one of my friends did – The 90s kid version of all that pour art that is so popular now. Was there any design trend that people loved more than rainbow splatter painting in the 90s?
Watercolor Coloring Books
These books really lulled you into a false sense of security, giving you perfect blending and shading with just a smear of water, provided you followed the coloring book code and stayed inside the lines ;). Nevertheless, they were so relaxing to sit and fill in, and I spent many a rainy day with a pile of these in front of me, completing one picture after another.
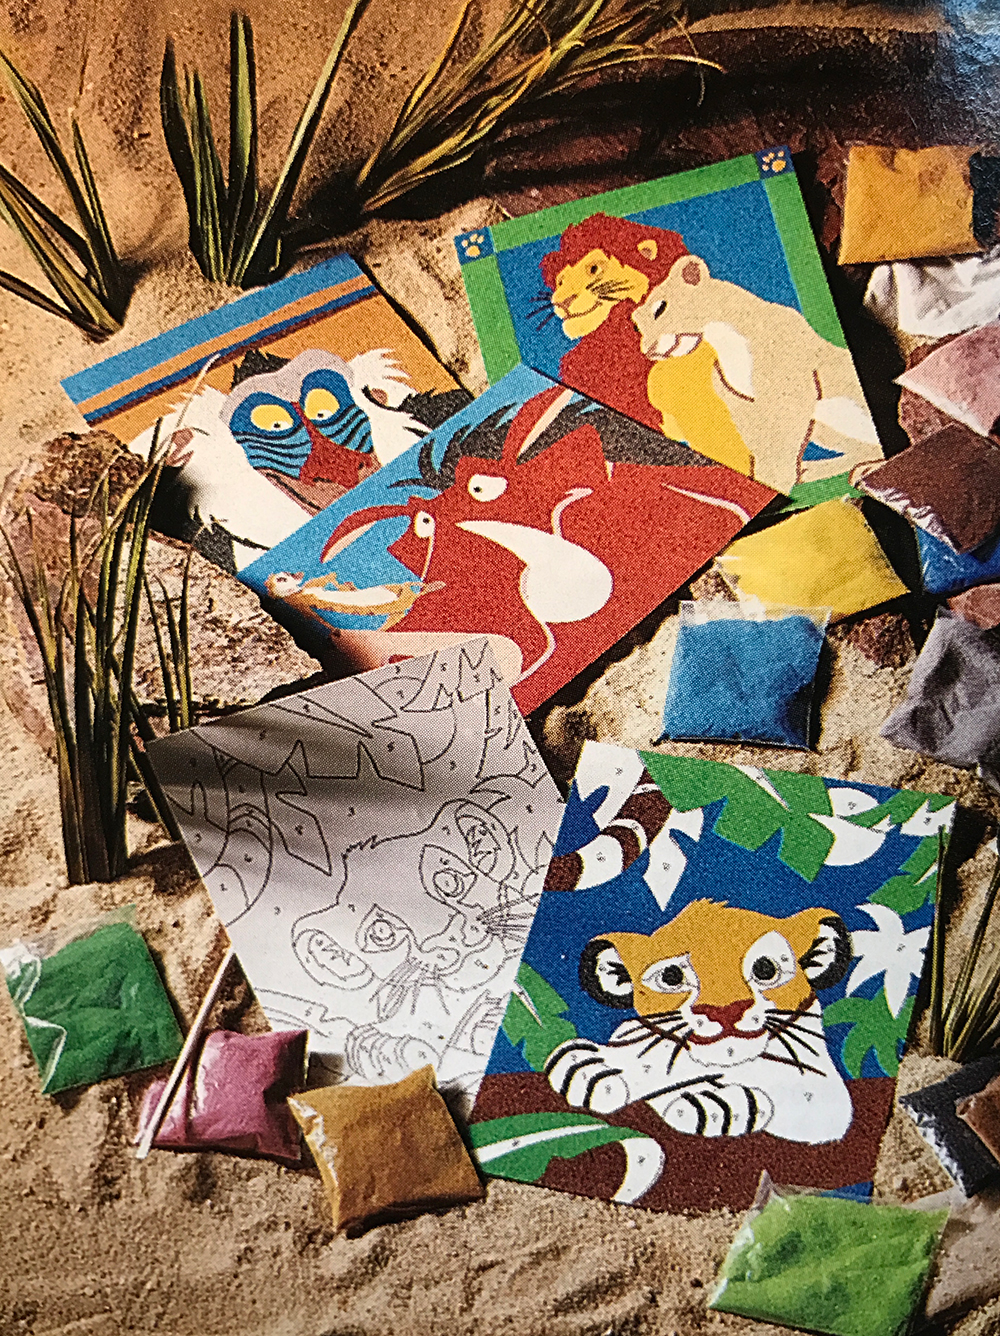
Sand Art
Like color by numbers but with colored sand, you would peel off one number at a time revealing a sticky surface to pour the corresponding colored sand upon to slowly reveal a finished masterpiece. Though Disney ones were always super popular, my sets were of unicorns and tropical birds!
Shrinky Dinks
As a kid the shrinky dinks I had were pre-outlined, and you colored them in like a coloring book before putting the plastic sheets in the oven and watching them curl up, shrink, and harden into durable plastic pendants or flat mini figures. As an adult, I discovered the fun of using blank shrink plastic to design your own one of a kind pendants covered in art! I sold these for a couple years in a local handmade shop downtown, and they did really well.
These truly are the toys that made me! I hope everyone gets what they were hoping for this Christmas, though of course, no gifts could ever possibly be as epic as these.
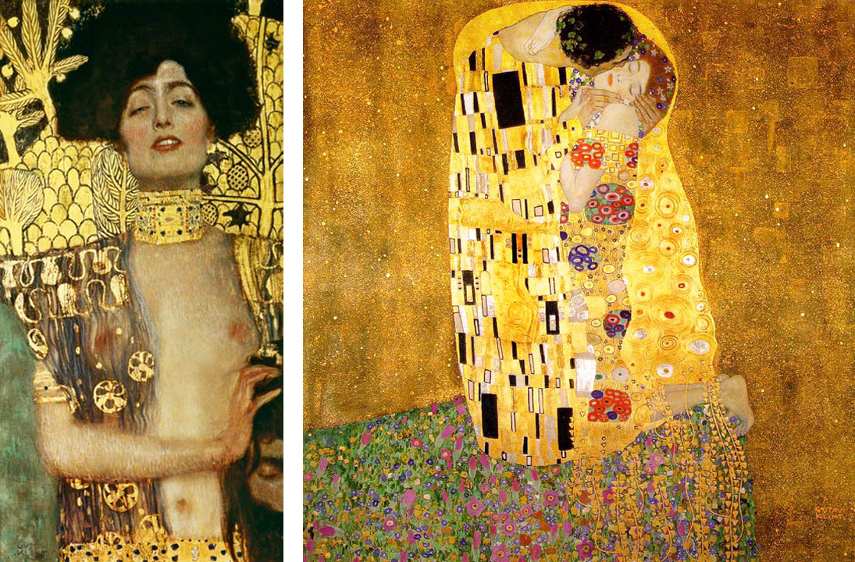
I got a bit behind on sharing my projects, but have now caught the awful Fall cold that is going around, so no better time than the present to sit and type with a hot cup of tea at my side. Gustav Klimt’s work, like that of the earlier covered Van Gogh, is one of those bodies of historical work that is recognizable even by non-artists because of his unique style that has been made readily available in print form to this day, and is appropriated and referenced constantly in new art. Though I’ve never experienced an emotional connection to his work, I love the use of metallics and vivid, overwhelming detail of his pieces as well as the merging of both realistic and painterly elements.
Klimt began as a decorative painter under the belief that art’s true purpose was to show viewers something beautiful, and got his start painting murals on the walls and stairways of lavish, wealthy homes. His personal work was charged with an eroticism that was not present in art at that time, and it earned him a good deal of disdain but he remained committed to depicting the beauty of the world as he saw it. His pieces have resonated and stood the test of time, enough that virtual immersive experiences of his work were made available this year in Paris and Austria.
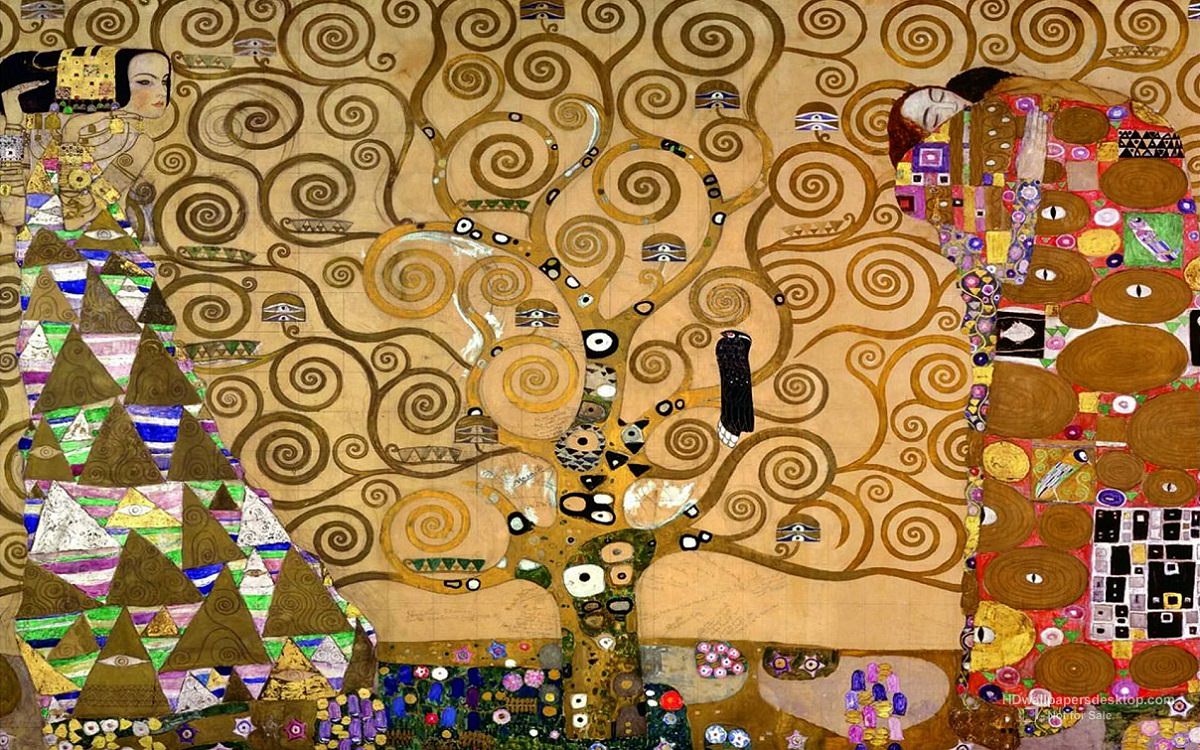
Not all of his work is sensual in nature or contains nudity, and there are plenty of other examples to show as inspiration if you are doing this project with younger audiences.
Klimt’s work incorporated figures and portraits, but learning how to draw faces and the human body properly is a whole semester of lessons within itself! To make a Klimt project that was accessible to all skill levels, fun, experimental, and stress free, we used collage. Some of Klimt’s portrait work does remind me of a very early form of fashion editorials, so we cut out models and celebrities from Elle and Vogue magazines to become the subjects in our Klimt inspired artworks.
Students were then encouraged to place their magazine cutout where they wanted it on the page, and trace around it with pencil to save the space. I recommend gluing the magazine cutout on last so it doesn’t accidentally get smeared with paint. After outlining, students could add on and sketch the outfit of their dreams with pencil. Once the basic outline was complete, students filled in the background and clothing in different shades of metallic paint first, and then could add detail overtop with pattern. As I’ve mentioned before, I work with a lot of adults with disabilities and seniors in my art program. Painting small patterns with a brush can be hard for some depending on their dexterity level so we made this project more accessible by also introducing the use of ink stamps for those who were struggling with fine motor skill. Innovation can lead to some simply amazing results, as can be seen by the work-in-progress above! Be sure to check back soon for more artist-inspired project ideas!
Another week, another artist! I shared my Van Gogh project last week. In week 2 we covered Henri Matisse. His personal story really resonated with the students, being a group of adults with varying disabilities.
Matisse spent the majority of his artistic career as a painter, being one of the leaders of the Fauvism movement in the early 1900s. Fauvism is characterized by a painterly, non-realistic representation of people and objects and a strong use of bold “crayola crayon” colors. Unblended strokes of pure color divide objects from their background rather than shading. He wanted his art to be calming and cheerful, an escape from the world’s troubles. In 1941, everything changed when Matisse was diagnosed with cancer and had to have surgery. His life was saved, but from that point forward he required the use of a wheelchair for mobility, and struggled with dexterity. Matisse famously said, “Creativity takes courage“, and at the age of 72 no matter how he had changed physically, he refused to give up on creating. He shifted gears to a cut paper collage format for his work as painting was harder to manage with his dexterity changes, creating yet another influential body of work. He ended up liking this new, modern style even better than what he had been working on before, and you can still see similar shapes, styles, and color schemes taken from his paintings and applied to his collage works, such as the organic leaf shapes. His final project was stained glass windows for the Chapelle du Rosaire de Vence as seen pictured above, designed in his iconic collage style.
Though the term disability pride wasn’t part of our vocabulary at the time Matisse was alive, I think his legacy perfectly embodies this concept. He did not look at disability as a barrier, but an opportunity to innovate.
For our project, we created beautiful decoupage bowls inspired by Matisse’s paper cut works. I chose to focus specifically on shapes present in his chapel design, though if you do an image search of his collage work you could find many other ideas. I cut patterns out of some scrap matte board for the students to trace. We used colored printer paper for the cutouts – It is thin enough to be able to bend along the round shape of the bowl without popping back up or creating massive wrinkles, but thick enough that the color of the bowl won’t show through. We used matte Mod Podge to apply and seal the shapes onto the bowl, and the bowls themselves were picked up at the dollar store, making this a ridiculously inexpensive project with beautiful results.
This would be a fun project to do with all ages from kids to seniors, and makes for a great gift idea if planned closer to the holidays or Mother’s Day. Since Mod Podge is not food safe, obviously you do not want to try to eat cereal out of these or something ;), but they are a perfect catch all for jewelry, keys, pens pencils and paperclips, or change. Also a cute decoration when filled with decorative orbs, glass marbles, or stones. I love color, and may just have to make one of these for myself at home!
Hello all! This is my first post I’ll be doing on my Creative Minds class projects I am leading with my program this semester. Each week we will be learning about a well known artist from the past or present, and completing a project based on their process and style. I work primarily with adults with disabilities or mental health issues, and though we will not only study artists with disabilities, mental health issues, addiction, or chronic illness, these individuals will be a special focus.
Today I’ll be walking you through an enjoyable and easy project inspired by the art of Vincent Van Gogh. Being the Coordinator as well as an instructor for an inclusive recreational arts program, there is always a wide range of abilities and experience levels in each class. I am excited to make art history accessible and fun for all ages and abilities. Vincent Van Gogh has always been one of my favorite historical artists, so of course he had to be the artist I chose for week 1. I know that he’s a lot of people’s favorite, but I have always felt a special kinship with him as we also happen to share the same birthday!
His use of light, color, and movement through swirling, visible brushstrokes has become iconic and easily recognizable even to those with no knowledge of art. Also common knowledge are Van Gogh’s struggles with mental health throughout his life. He was blessed with a supportive and loving family member, his brother Theo, who financially supported him so that he could continue painting despite being unable to hold a job or make an income for himself. It seems his brother saw firsthand the transformative power of art, giving Van Gogh at least a few more days, months, years, or sometimes just moments of peace and joy than he would have experienced otherwise.
Oil paints are pricey, require copious amounts of time to complete a piece, need adequate ventilation that may not be available in all classrooms, and can be frustrating for beginning artists. So, we ditched the oil paints for oil pastels!
The first step in our project was to make a simple outline in pencil first. Students were encouraged to be inspired by the provided images of Van Gogh’s most famous works, but not necessarily to copy. They could make a scene, a still life, a person or animal, or anything else that came to mind. They could then use the pastels to trace over their pencil outline, and add more lines in between to mimic Van Gogh’s iconic style. Students could fill their paper with as many swirls, stripes, or dashes as they wanted as long as they still left white space behind, because next the magic happens!
After their pastel outline was completed, students could fill in their different areas with watercolor washes, and watch the oil pastel repel the water. Though not a requirement, this technique is especially amazing to watch when washing darker watercolors over bright or light pastel. One of the students even commented that it was “like magic”. This process is simple enough to be enjoyed by students of all abilities with minimal frustration, but also fun for more advanced students. Pro tip: make sure you have enough water in your paints! If your watercolors are brushed on too dry, they won’t repel as strongly. Also, be sure to use paint brushes with soft bristles. Stiff, scratchy brushes are harder on the oil pastel and will not give as neat of a result.
There is a common narrative that Van Gogh suffered so much because while he was alive his art never became famous and people wouldn’t buy his paintings. I don’t know about that … I am a Doctor Who fan, and for those of you unfamiliar with the show it’s about time travel. Who would have thought, but this whimsical sci-fi TV show ended up moving me emotionally more than any work of cinema I’ve ever seen, and I watch a lot of movies! In my favorite episode, our adventurers go back in time to pay a visit to Vincent Van Gogh. They end up whisking him away to the future, where he can see all his paintings on display in a museum, and hear his fame being lauded. It is hoped that after seeing this, Van Gogh’s spirit will be renewed, and once he is returned to his own time he will not end his life as he did in history. They hope that when they visit that same museum again after their adventure, there will be walls of new Van Gogh paintings, having altered the past by showing Van Gogh his future. That does not end up being the case.
We put so much emphasis in our culture on fame, money, talent, and popularity that it is hard to accept that these things are not a magical panacea to fix all of our problems, and that sometimes these things are not enough to make us happy.
We need to keep reaching out to each other. As this episode concludes,
“The way I see it, every life is a pile of good things and bad things. The good things don’t always soften the bad things, but vice versa, the bad things don’t always spoil the good things and make them unimportant.”
Make it your goal to add to the pile of good things for the people you encounter each day.
A student that had been reluctant about this project at first because they don’t draw or paint ended up having a blast, saying they felt like they were getting to play and be a kid again. A lot of times, that is exactly what art is about! As Van Gogh himself said, If you hear a voice within you say ‘you cannot paint,’ then by all means paint, and that voice will be silenced. I hope some of you will decide to play and try this project yourself at home! Be sure to check back in the following weeks for more fun project inspiration.
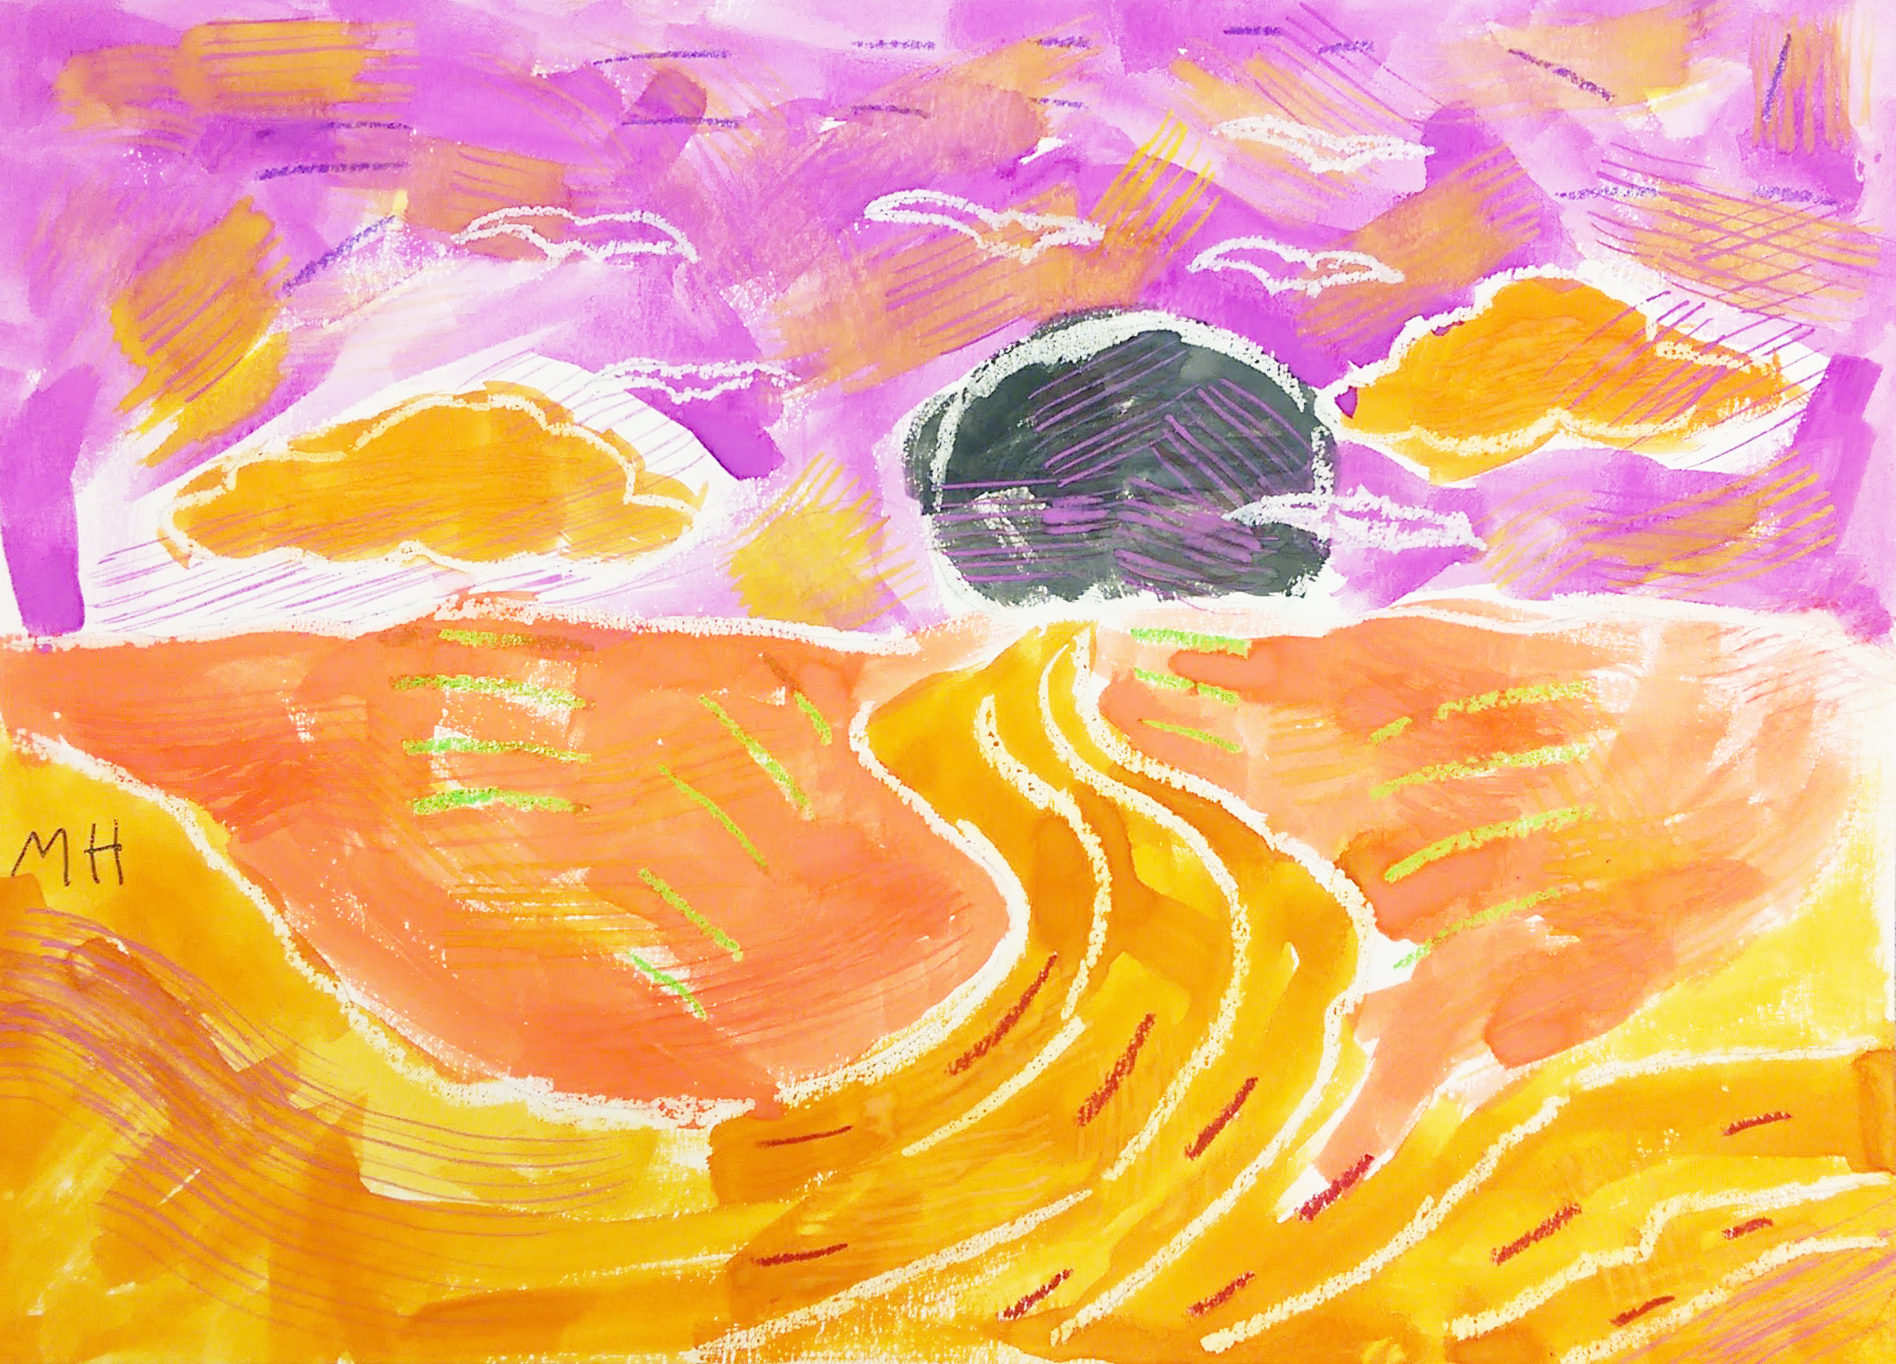
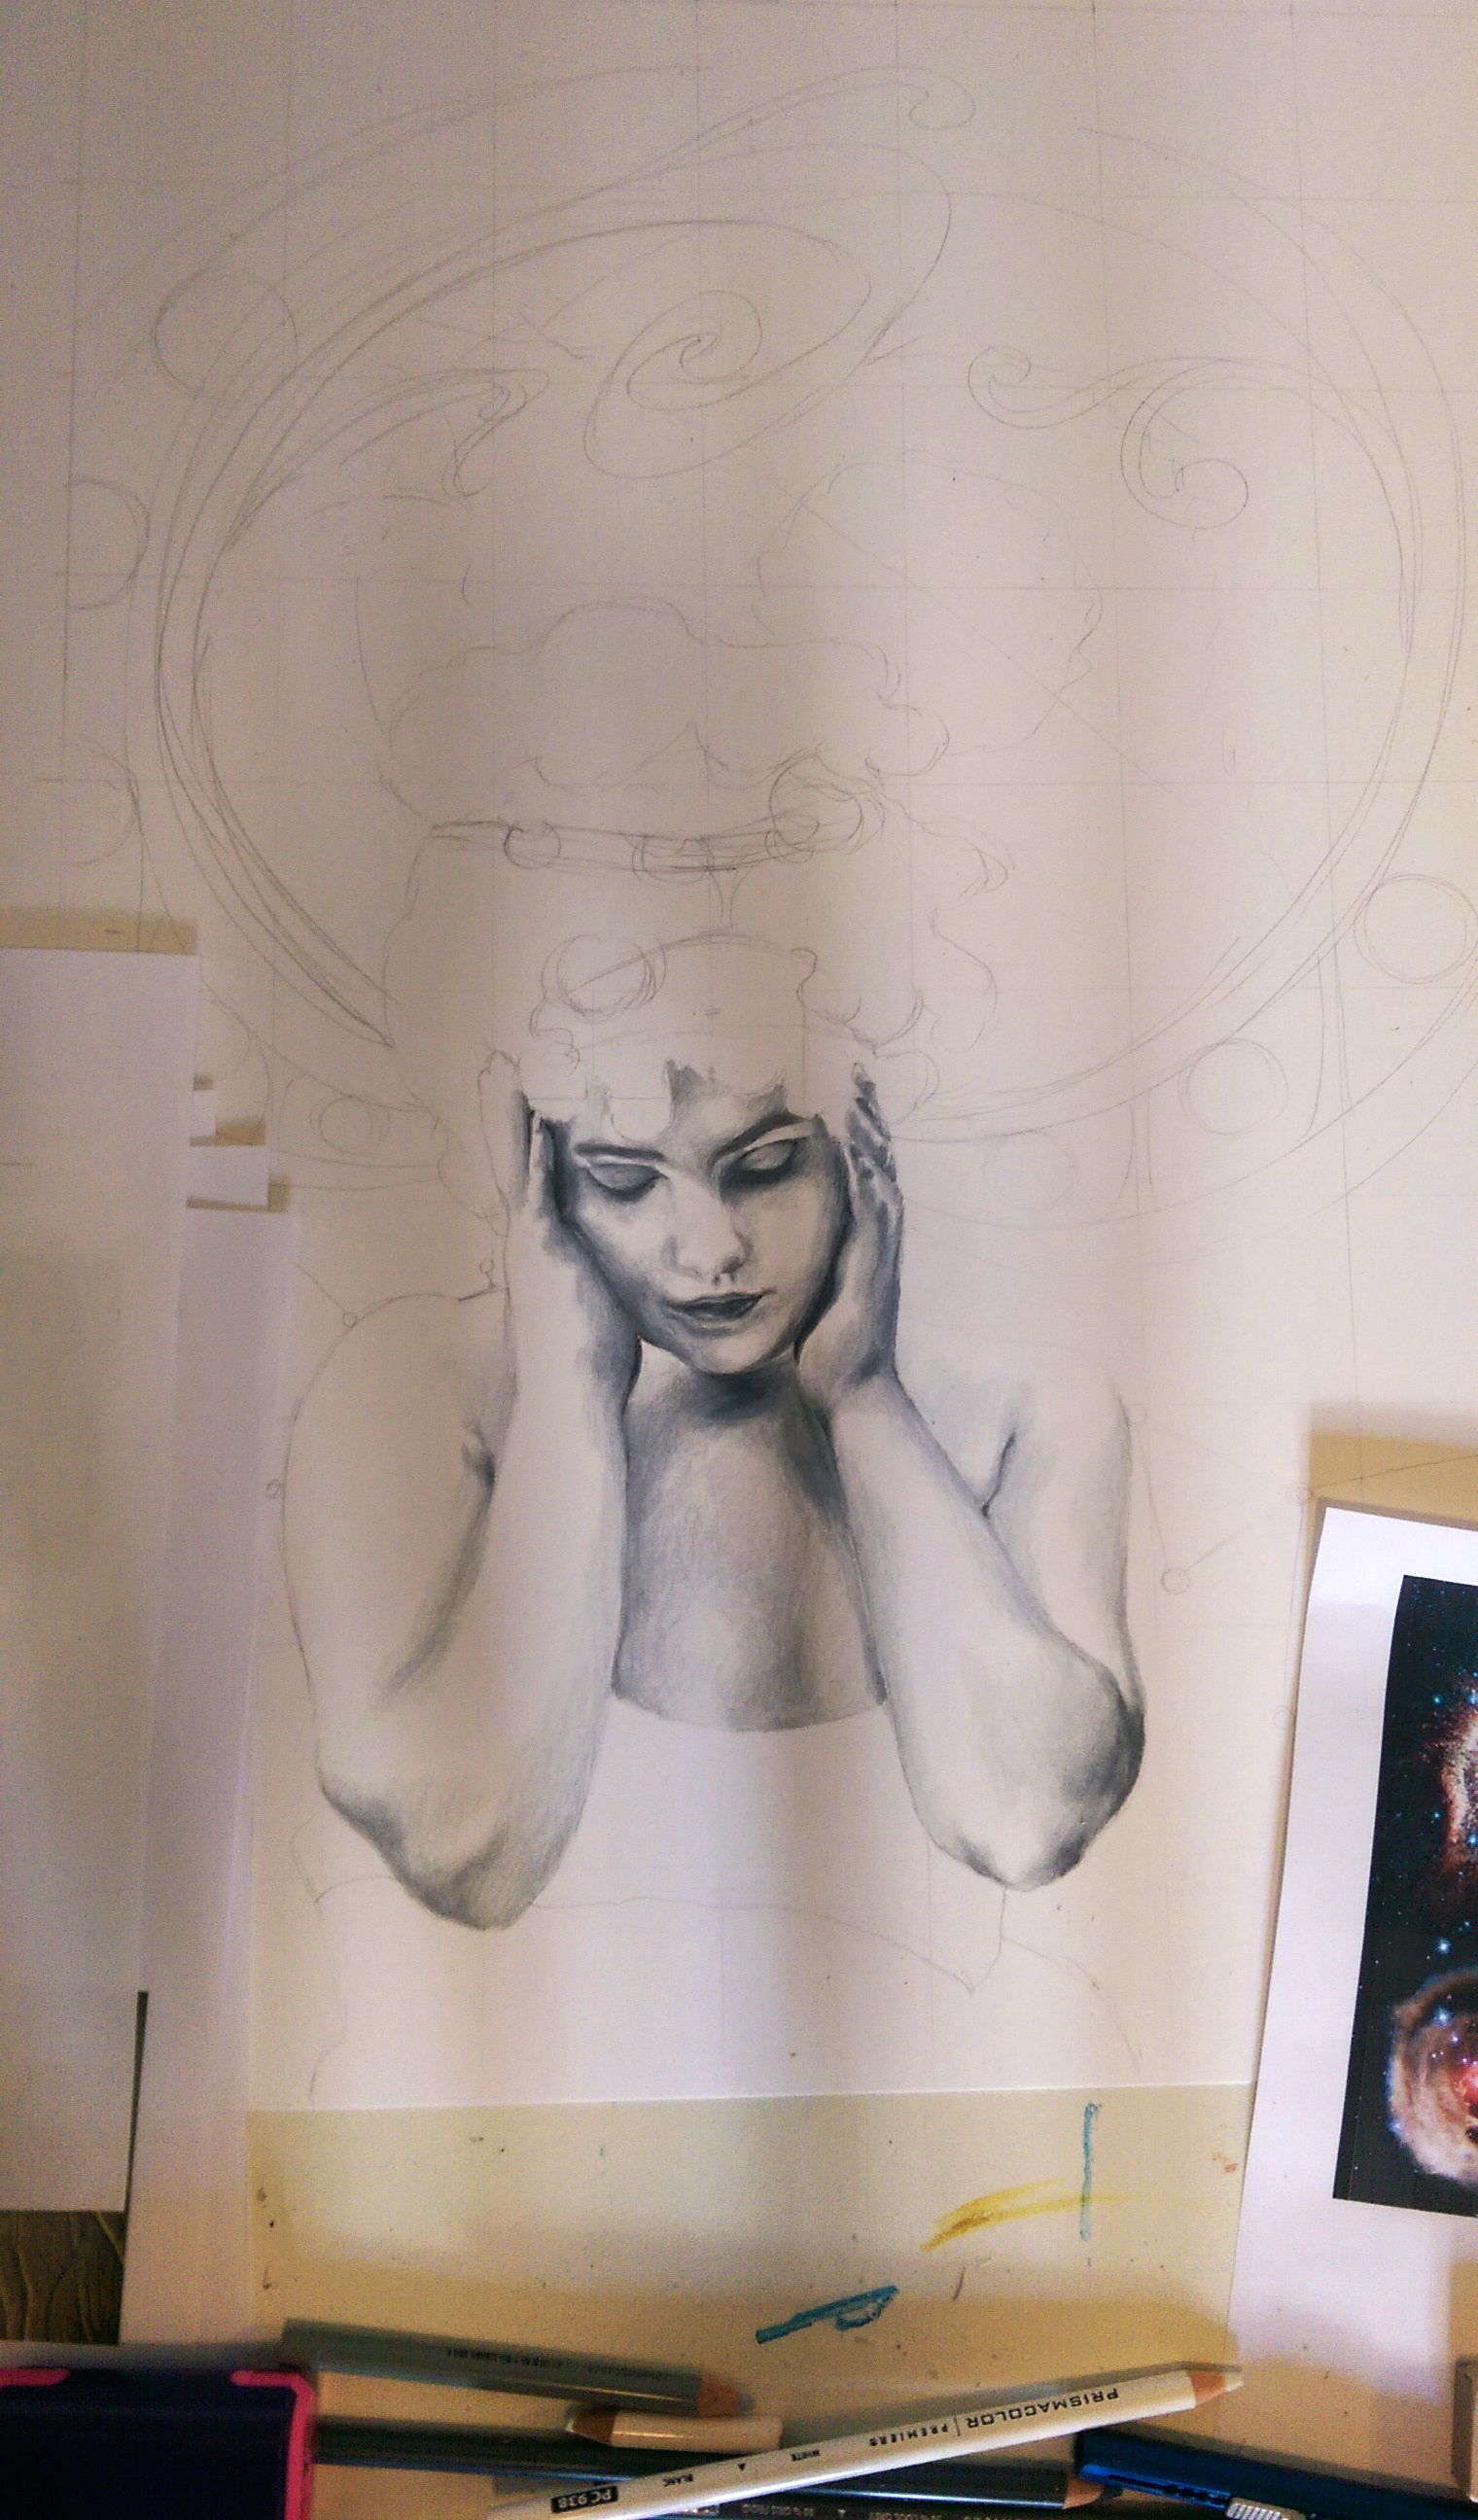
I started a new conceptual portrait, this time involving stars and space imagery which I haven’t used a lot in the past – time to retire the flowers and forests for a bit. I am also going to be adding touches of art nouveau, one of my absolute favorite design periods. I’m not certain what main accent colors I will be using with the black and white as of yet, but I’m leaning towards navy and gold, we shall see. The tilted downward angle of the face is certainly more challenging then the classical head and shoulders portrait, but after much erasing, success! Even practiced artists are in love with erasers.
When I need a break from the more technical, detailed work, I’ve been having fun growing my little army of wooden dolls – currently two strong. Who am I kidding, painting those tiny little clothing patterns and facial features on wood with a couple-hairs wide paint brush is still technical and detailed :P. I have always loved the simple cuteness of Japanese kokeshi dolls, and I wanted to try my hand at designing my own take on them. I figured wood would be easiest to paint with acrylics, so I perused the wood crafts aisle at Michaels after teaching a class one day and found 2 bags of shapes, one conveniently labeled “heads”, the other “bodies”. What luck! It doesn’t get much easier than that. Along with glue, I ran a heavy toothpick through the partial hole in the bottom of the head and the top of the body for extra support. This would be a really fun project to do with kids as well. You could even glue on small googly eyes, and some yarn for 3-dimensional hair, cut pieces of fabric or patterned paper to glue over the body, some small buttons down the front … the possibilities are endless. I will post pictures of their friends once I finish some more, promise! I will also keep you updated on the new portrait. Have a great start to the week everyone!
Pretty simple supplies … it’s all in how you decorate them!
Two of my non-handmade modern kokeshi dolls
Each of them just has to have SOMETHING on her head. Yes, that is a real acorn on the left, brushed gold and sealed. I was on a hike and quite literally exclaimed to my boyfriend, “They look like mini hats!!!” and started frantically collecting as many as possible. I knew they would come to good use one day!


")

 I promised I’d catch up in posting all my Creative Minds art history projects from the Fall and Winter semesters!


 I never had this, but one of my friends did – The 90s kid version of all that